
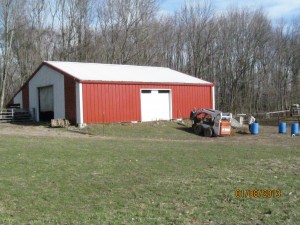
This 45 foot hay barn will gain a solar CANOPY extending from the South face just above the rain gutter.
This simple 45 foot hay barn on the East Side of Cincinnati is the location for a 32 panel PV SOLAR CANOPY.
With my help, the owner of this 32 horse boarding stable will erect a massive solar canopy that will cover about 80% of his electricity usage. It will include two Sunny Island battery powered inverters for off-grid backup capability.
This stable is located at the end of a long country road, and it seems he is always first to lose power and last to have it restored. Watering the horses is important to their health, and the backup system will keep trough heaters and well pumps operating when the weather is at its worst in terms of outdoor temperatures.
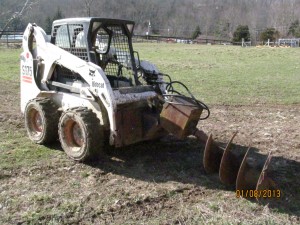
This 24 inch auger accessory makes drilling the foundation holes an easy task
We were very lucky on this installation, since the property owner had a small bobcat and an augerattachment with a 24 inch bit. The array will measure 13 feet tall by 42 feet wide, which is more surface area than the wing of a regional jet!
This makes it doubly important to anchor the panel mounting structure to mother earth! The property owner is a bit of a scrounger, and he had a nice supply of 1/4 inch thick X 4 inch angle iron for the front row support legs. This will be capped by an S shaped steel beam across the front and rear row. Standard UNIRAC solarmount 160 inch rails will then carry the panels. Brackets attached to the barn vertical wall beams will carry the rear steel rail. Prevailing winds are directly from the south/southwest so the majority of wind loading will be in a downward direction. The steel angle iron and 24 inch concrete columns exceed the requirements needed to achieve the 90 MPH wind rating for the array. AND, the owner saved a bundle since he had the parts on hand!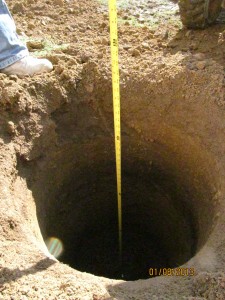
Why bother to take a picture of a hole in the ground? Depending on the jurisdiction and how it works in your area, you may need an inspection BEFORE your pour, so that hole depths can be validated, to assure safe anchoring of the ground mount array. In this case, the property is zoned AGRICULTURE, and inspections are not needed. But just to be safe we documented the depth of every hole. Paperwork can be a pain, but documenting your actions can be worth it’s weight in gold if problems crop up down the line somewhere. And, above all, if you are unsure of where you’re digging, CALL BEFORE YOU DIG. If you need them, GET PERMITS as well. They might be a bit of a hassle, but they are there for a reason – mostly to protect YOU from getting in trouble. Your solar array will be productive and last for MORE than 25 years, so take your time and do things RIGHT the first time!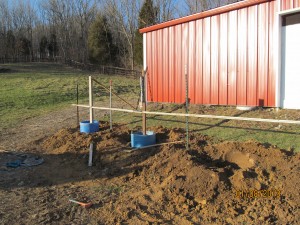 So here is where we left the project yesterday.
Those blue forms for the concrete area 50 gallon polyethylene barrels that can be had for about 5 bucks apiece. Cut the ends out and they make forms that will last forever. metal posts and cross beams provide some stability for the steel angle beams that will form the front supports for the array. I’ll add more posts as the project moves along.
It IS January, and weather can always be an issue, but this DIY SOLAR enthusiast plans on seizing every opportunity to get this array completed an online as soon as possible to start reaping the benefits that PV solar can provide!!


