44 panel job using SunPower panels.

IMG_4932

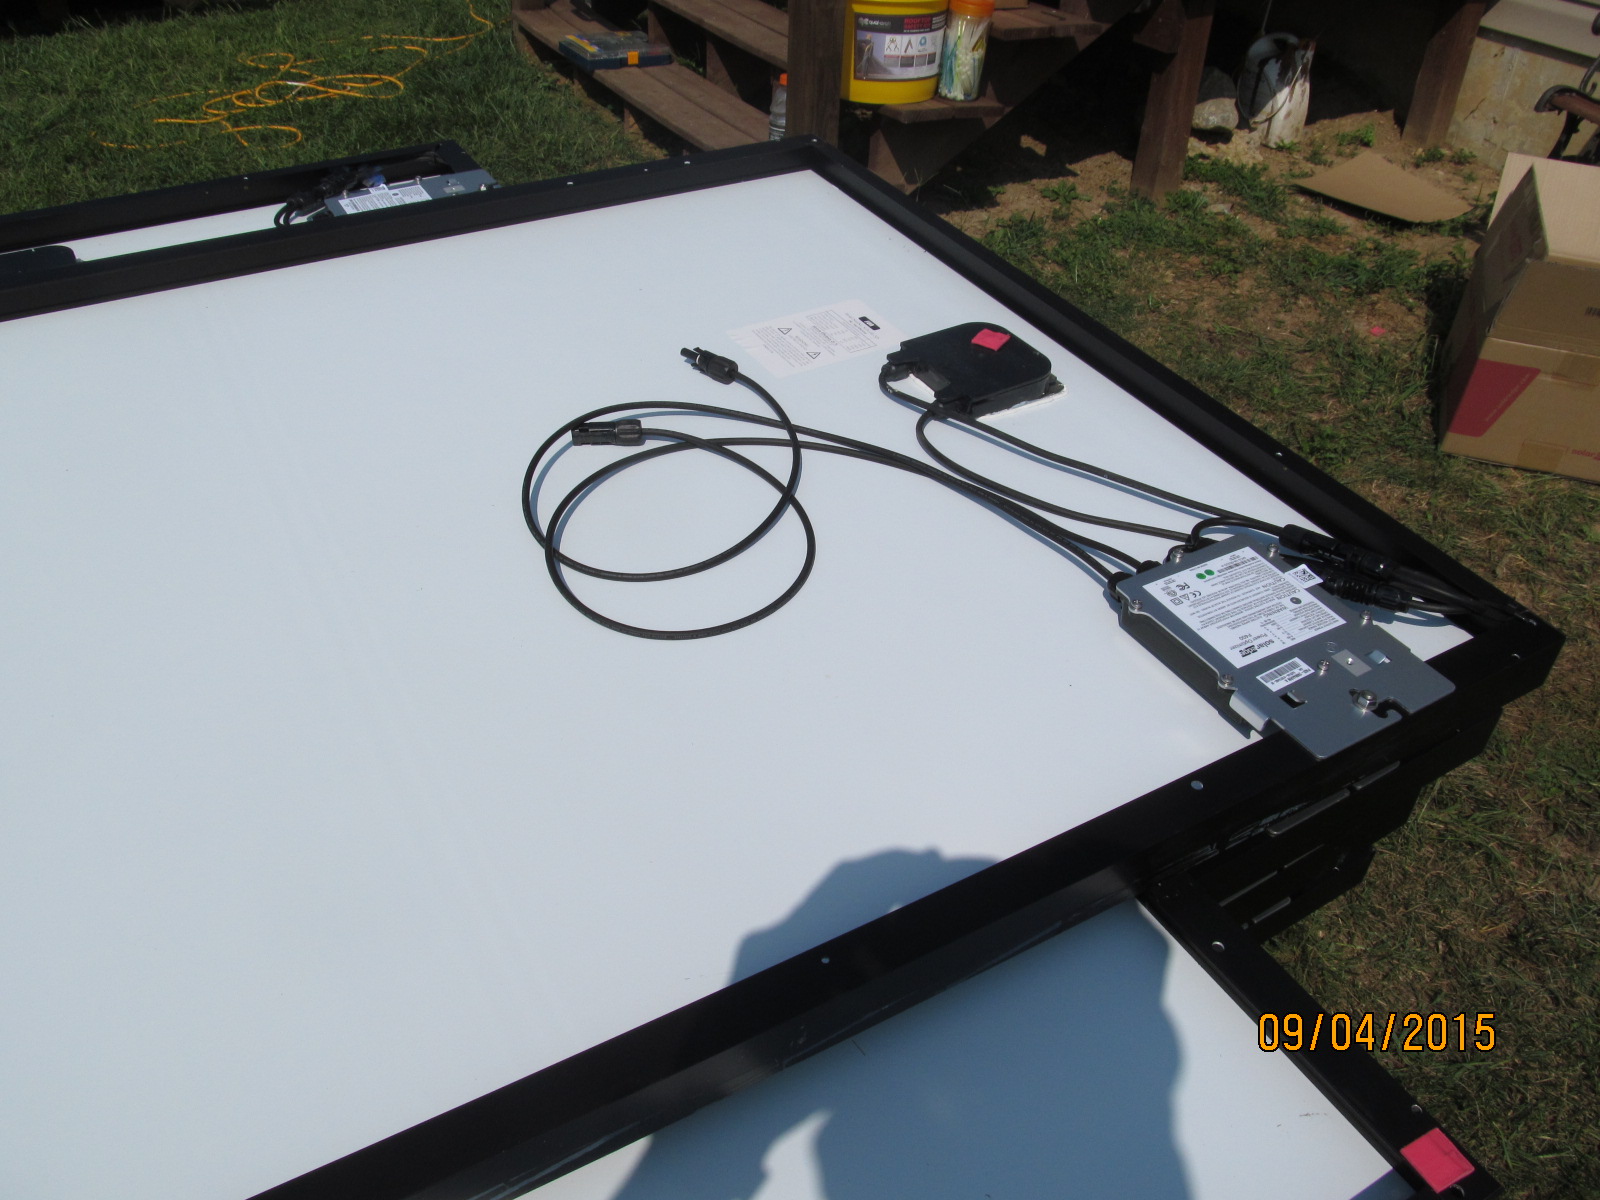
SolarEdge Maximizer mounted to panel and leads dressed correctly.

IMG_4933

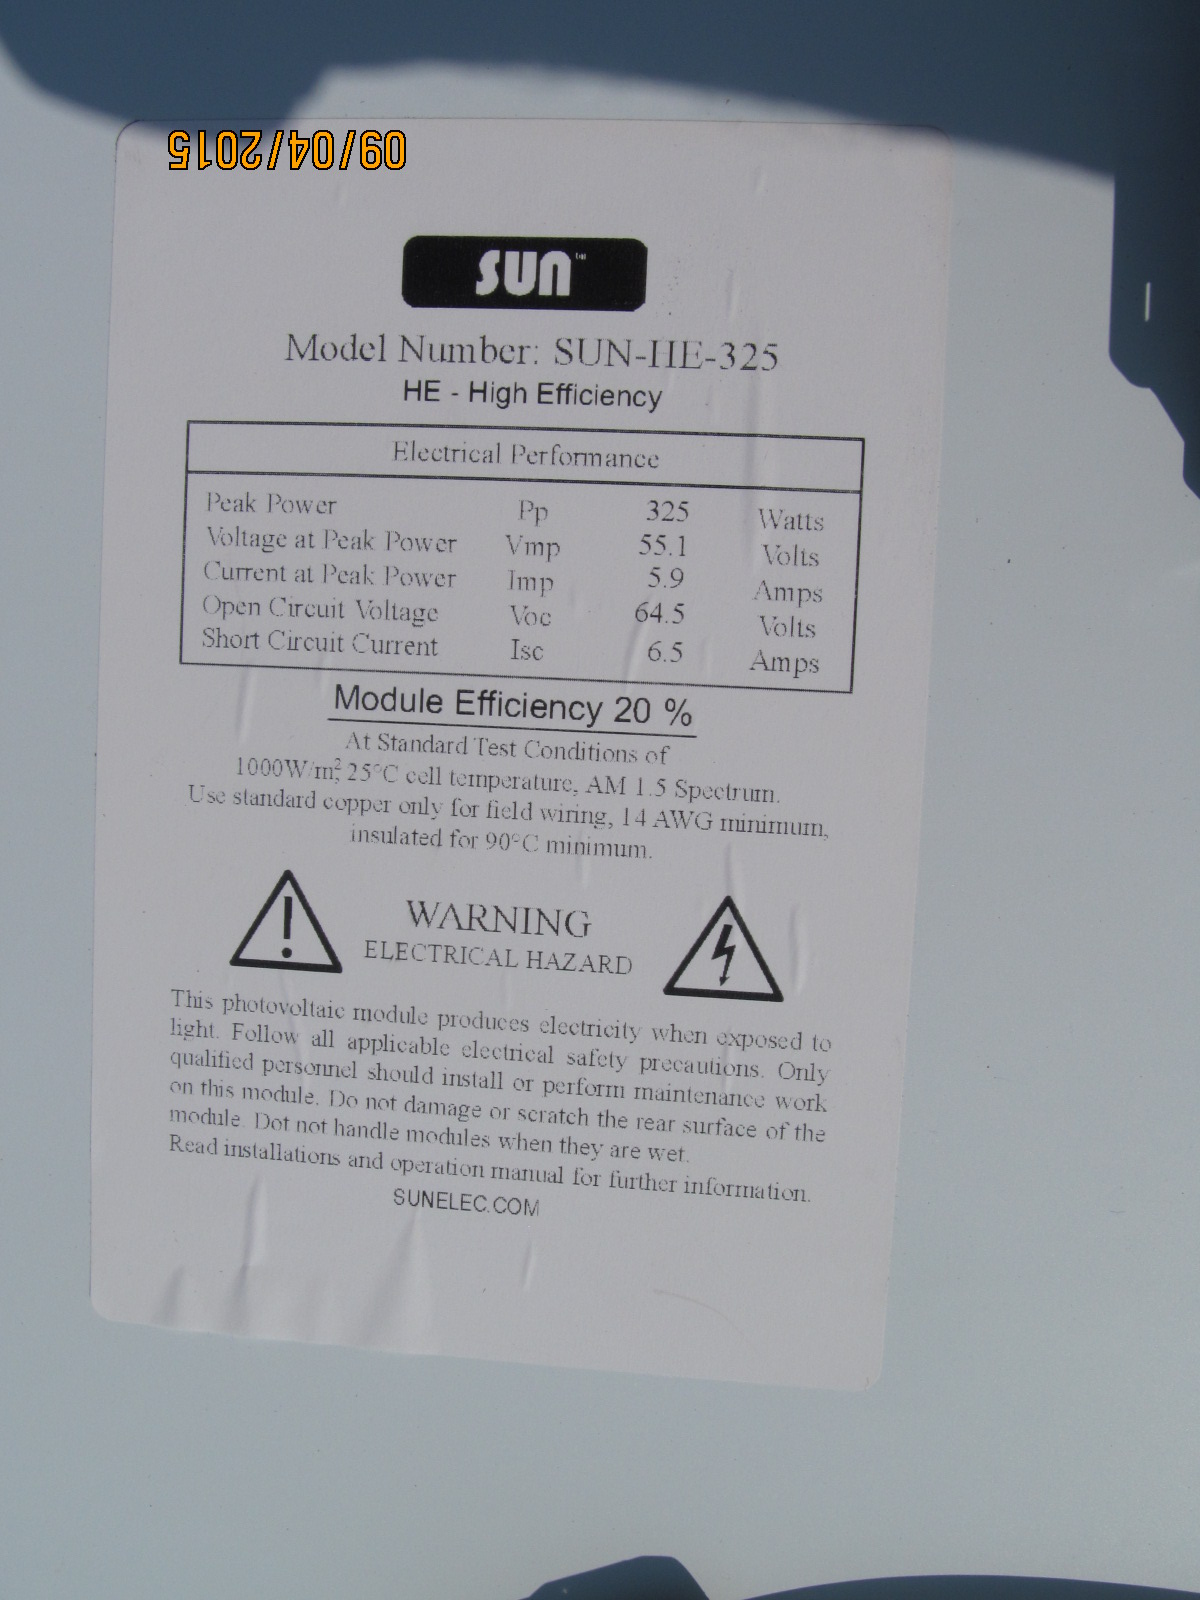
label on SunPower. Impressive specs!

SunPower panels are made by a vertically integrated company in California using proprietary cell technology their founder developed. Their cells are small, but very efficient, with NO shiny silver conductors blocking the face. These cells are found on most Military, aerospace, and high-end jobs! Imagine my surprise when my favorite panel reseller announced they had some for sale. Normally, these panels go for about $1.50/watt, and can only be purchased directly from SunPower. The panels we got were obviously “2nds”, but the reason why was because their leads were shorter than standard! This project used a SolarEdge inverter, that has MAXIMIZERS mounted at each panel, so the slightly shorter lengths had ZERO consequence on this project, and the homeowner got a tremendous system at a DEEP discount. The reseller put his own label on the panels (which promptly fell off at the first dew!), but from the photo you can see the specs, and they are impressive. What’s even more impressive is that the panel SIZE is 41 X 60 inches – SMALLER than standard 60 cell panels on the market!.

IMG_4971

two SolarEdge 7600 inverters mounted to panel in the basement

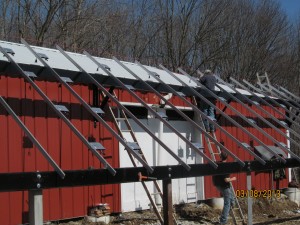
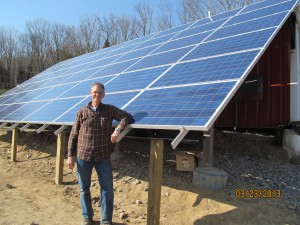
The job came to a total installed power of 14,300 watts, so I recommended that we use a PAIR of SE 7600 inverters. PUCO rules for Ohio say anything over 6000 watts must have a utility grade meter, but for this job we needed TWO meters. The client had TWO 200A service panels, and in order to be in compliance with the NEC (National Electric Code), we could not backfeed both inverters into one panel due to the current limitation for backfeeding. (1.2 X buss rating minus the main breaker) so it would be (1.2 X200)-200 =40A. So we ran each inverter through a meter, to a disconnect switch mounted on the outside of the house (required by the local Fire Department) and then to each inverter. It was a little extra work, but it passed all inspections with flying colors. Both inverters were mounted side by side in the basement, and the 4 strings were run down 2 rigid metal conduits from the roof all the way to the inverters. When running high voltage DC lines inside a residence they MUST be in RMC. That way, if there is ever a short, it will go to the metal conduit and cause a breaker to pop rather than get hot and start a fire! Here’s a picture of the inverter pairs and the happy homeowner!

IMG_4956

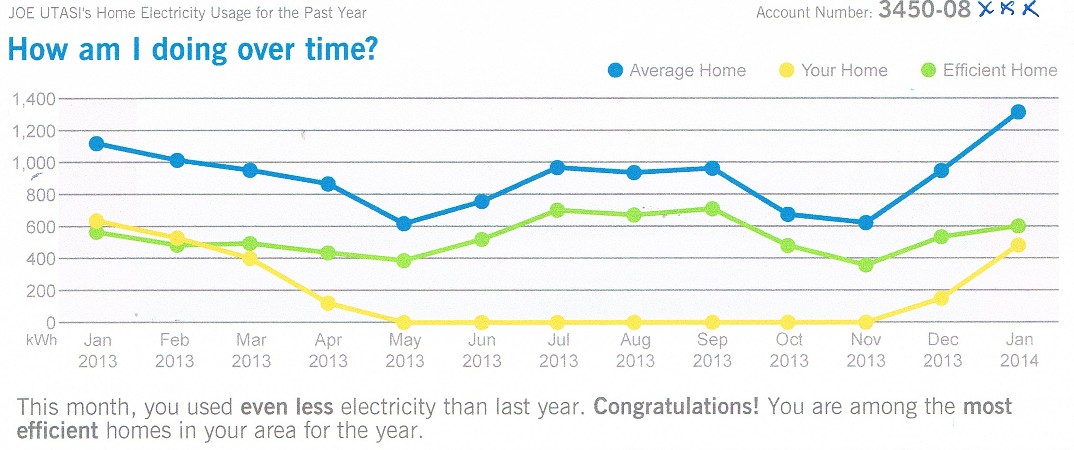
Finished installation of 44 panels on south facing roof.

Standard Everest rails and hardware were used to mount the panels to the roof. 8 of the panels were darker than the others, so we put them centered in the bottom row, between some plumbing vent stacks. There’s not a tree anywhere near the home and the roof faces due south, so it makes a LOT of power!!  The owner provided a crew of 4 and the whole job took just a hair more than 2 days of time. They prehung and wired the inverters in the basement, so all that was required was the panel hardware and mounting, and running the HV solar wire down the RMC to the inverters in the basement! This setup makes about 1,500 KWH per month (average) which in our area adds up to about $150 in power savings!

Filter protects gear from EMP!!

I just received this announcement in an email from one of my many electronics industry sources. It describes a new filter, used by the military to protect sensitive electronic gear from EMP or equivalent events. Just thought I’d pass it on! HEMP Filter link

MOTHER EARTH NEWS FAIR 7 SPRINGS PA

Wow, thanks to all who attended my seminar this year! I changed it up a little and made it a presentation of good-to-know FACTS about solar – every aspect of it. Ended up with about 10 minutes of open questions, and I got lucky again – I was able to answer every one with a solid response! Sorry I left my NEW box of business cards at home, but I think the 12 folks who came up to get the 12 I had were the folks most interested in future contact (I hope!). I promised I’d post the PowerPoint presentation, so here it is with the presenters notes included. MEN FAIR 2014 Presentation Nothing that will rock the world, but there might be just that one photo, or factoid that you’ve been looking for! Thanks again for all who were in the PACKED tent (even if you just wanted to get out of the rain!)

A whole TOWN goes off grid in Germany!!

Found this story today, and it is really amazing how a little bit of willpower and cooperation allowed this small town in Germany to not only go OFF GRID (total disconnect!) but to also SELL power to neighboring towns at a discounted rate! Read the story here: OFF GRID GERMAN TOWN STORY

HOW MUCH CAN YOU CUT YOUR BILL WITH SOLAR?

It depends on how much roof space (or yard space) you have, and how many panels you install. A good average system size is 24 panels, which in most cases is a PALLET of panels, which gets you the best pricing. My home has 24 panels on it. 20 of them are 230 watt panels and 4 are 240 watts, added at a later date.

My house faces South West, and I have two large hills on the East and West side that shade my roof for an hour and a half in the morning and an hour before sunset. All that considered, here’s what I just got from the electric company on my most recent bill. It tells the story. I have gas heat, so this is just for my electric usage, but that includes AC in the summer months!

Electric chart for solar equipped home

Electric Usage chart for my solar equipped home.

Finish phase 2 expansion at East Fork Stables

Racking goes up at East Fork Stables

Cinci Home Solar works with EFS to get racking up using 50% on hand materials.

Missed this photo on the first part of this adventure. The owner had materials on hand, and made the posts of Steel L channel, the beams from Steel S-channel, and the barn support brackets from 2 inch steel L material. The owner (George) is a VERY resourceful fellow – some might call him a scrounger, but I call him SMART! I passed along a great vendor deal on the solar panels and he purchased them direct. The BOS (balance of system) materials was purchased through Cinci Home Solar at great pricing, bringing the whole project in at about $3/watt, and this includes the battery bank and backup power inverters in addition to the Enphase micro-inverters behind each panel. The work was spread over 4 full days, with the helper crew varying from 1 to 3 guys and myself. Plenty of manpower to get this rather large project done in a timely fashion. Winter is really variable in Cincinnati, and whenever the weather was predicted to be above 40 and sunny, George called and we got the job done. Fortunately, this job was a quick drive from my home, and it wasn’t a problem. Normally, these 3 or 4 days would have been all condensed into one extended visit! I aim to please, whenever possible…


DIY Solar array expansion by Cinci Home Solar

DIY Solar expansion -adding 2 more rows to bottom of 32 panel array.

After we finished the 32 panel array, George saw that some minor grading of the ground near the bottom would allow plenty of room for 2 more rows! A week later he called me and said “Hey Joe, come on out and lets get these 2 rows installed – tomorrow’s weather looks great. So we did!  When I ordered the extra components, we also added 8 more rails – one under each of the 8 columns of the upper 4 rows. You can see them mid-panel in the picture to the right. This provided the extra strength and rigidity that the span required for both wind and snow loading. Splicing the extra rails that extend to the newly installed lower beam also provided a counterbalance to the free span above.
The two missing panels at the lower left were intentionally left off because of a stone access road to the hay barn that George didn’t want to move.


DIY Solar install of Enphase M215 Micro-inverters

DIY Solar installation of Enphase M215 Micro-inverters.

This is what the backside looks like after everything is in place. After the rails were set, the Enphase M215 Micro-inverters were mounted. Then the #6 bare copper ground wire was run in series to each inverter. We grounded BOTH ends of the #6 copper, just because we could. Next came the Enphase TRUNK Cable, mounted with stainless steel clips to the rails. Then the panels were added, the micros were plugged in to the trunk cable and the panel leads connected to the micros. One end of the trunk cable is sealed with a weather tight cap, and the other goes to a weatherproof junction box (white) to transition to standard exterior rated 12-3 with ground romex. The romex connects to a breaker box with a 20 amp 2 pole breaker for each string of 16 and 1 string of 14 panels. Then, the entire array is nicely dressed using tie wraps so that all the wiring is suspended between the panels and the bottom of the rails to keep it from whipping in the wind or getting snagged by anything.


Power panel mounted below array

Power Panel beneath the array, mounted to the side of the hay barn.

Here’s the power panel. Public Utility Commission in Ohio says any array over 6Kw must be metered by a UTILITY GRADE meter. Got one on Ebay for $35. Breaker box on left contains the 3 solar breakers. That feeds through the meter to the master breaker box on the right. Master breaker box connects to the utility grid via a buried conduit over to the other barn that had power in it already. Below the utility grade meter is the Enphase ENVOY monitoring unit that ties all this to the internet so George can watch things from his home computer. He can share a link with his friends as well. I’ll post this link soon as I get it from George! The Utility voltage here is rather high – close to the limits for most inverters, at 254Vac. This causes a few of the inverters to occasionally shut down (to protect themselves). I’ll be looking into this further on my next visit to see how we might correct this…


Almost finished array by Cinci Home Solar

Almost finished DIY solar array accomplished with a little help from Cinci Home Solar!

Here’s the finished array. Still need to trim the excess rail length at the bottoms. If you look close, you might just spot some mis-alignment within the array. George got 2 pallets of panels. Same part number, same vendor, but one pallet was 1/2 inch shorter on the long side (out of spec…). We didn’t catch this till 5 were mounted in the top row. George, being a prudent and thrifty fellow, called the panel supplier and negotiated a compromise that didn’t require a return of the panels. The size only affects the esthetics slightly, and a cost reduction is pending!  The Enphase ENVOY normally communicates over the power lines, but there’s a half mile of them back to the house and that’s too far for it to work, so I added an Engenius EOC-1650 at the house as an access point, and atop the array as a client/bridge. It works great – with 100% signal integrity, and also provides WIFI to his customers and visitors! The EOC-1650 is that little white gadget at the top right of the array.