Ohio Senate Bill 58 puts solar RPS at risk

If you live in Ohio and own or are considering installing residential or light commercial PV solar, please contact Governor Kasich at his office and tell him you want him to oppose SENATE BILL 58, currently in discussion.
I’ve encouraged everyone I know to do so, and I emailed his office last week. Below is the email response I got:

Dear Joseph:

Thank you for writing with regard to Senate Bill 58. Your letter has been forwarded to me for my review. We appreciate that you took the time to share your views about this important piece of legislation.

Senate Bill 58 is currently being debated during the 130th session of the Ohio General Assembly. Please be assured Governor Kasich will keep your views in mind if Senate Bill 58 is passed by the General Assembly and forwarded to the Governor for his signature. I encourage you to share your concerns with your legislators, as your input will be important as they review this legislation.

Once again, thank you for writing to Governor Kasich. Please do not hesitate to contact the Governor’s office if we may assist you in the future.

Sincerely,

Dave Ward Director of Constituent Affairs

We must all pull together to RAISE the percentage of the RPS (Renewable Portfolio Standard) upon which the Solar SREC values are tied, if we want to preserve the extra value that this represents to the smaller producers of solar energy!! It’s currently pegged at a max of 1/2%, and should be more like 2% of the total 12% renewable energy long term goal.

Thanks!
Joe

Power Point for Mother Earth News Festival in 7 Springs PA

Just thought I’d post this for the convenience of those folks who might attend my seminars this year, and would like to review them at their leisure from home. Even if you don’t attend the fair, there’s some pretty good info in this presentation for anyone considering doing PV Solar as a DIY project. The rest of my blog is filled with lots of detailed photos and text from solar projects of all sizes and equipment types.

Cinci Home Solar presentation at 2013 Mother Earth News Fair in 7 Springs PA

DIY Solar LOW electric bill!

Almost Zero electric bill for last month!

DIY Solar results in almost ZERO electric bill for the month!

Just a quick post. I’ve mentioned my little house in the country many times and I finally found the energy hog! It was my septic aerator pump. It’s a 3/4 horse air pump, and it was running far too often. I changed the timer settings and cut my biggest energy user by 70%. I added panel #13, and I think I’ve almost reached NET ZERO energy for this little house!

Nothing makes me happier than seeing a ZERO or near ZERO electric bill. Keep in mind, the solar also covers the fixed portion of the bill that is NOT electric usage. It renews my belief that doing this is the Right thing, right now.

Solar has never been more affordable, so if you plan on staying in your home for the next 20 years, CALL ME and I’ll show you how to do DIY SOLAR in a quick, effective and above all AFFORDABLE manner! It just makes good sense.

Finish phase 2 expansion at East Fork Stables

Racking goes up at East Fork Stables

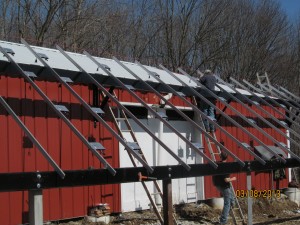
Cinci Home Solar works with EFS to get racking up using 50% on hand materials.

Missed this photo on the first part of this adventure. The owner had materials on hand, and made the posts of Steel L channel, the beams from Steel S-channel, and the barn support brackets from 2 inch steel L material. The owner (George) is a VERY resourceful fellow – some might call him a scrounger, but I call him SMART! I passed along a great vendor deal on the solar panels and he purchased them direct. The BOS (balance of system) materials was purchased through Cinci Home Solar at great pricing, bringing the whole project in at about $3/watt, and this includes the battery bank and backup power inverters in addition to the Enphase micro-inverters behind each panel. The work was spread over 4 full days, with the helper crew varying from 1 to 3 guys and myself. Plenty of manpower to get this rather large project done in a timely fashion. Winter is really variable in Cincinnati, and whenever the weather was predicted to be above 40 and sunny, George called and we got the job done. Fortunately, this job was a quick drive from my home, and it wasn’t a problem. Normally, these 3 or 4 days would have been all condensed into one extended visit! I aim to please, whenever possible…


DIY Solar array expansion by Cinci Home Solar

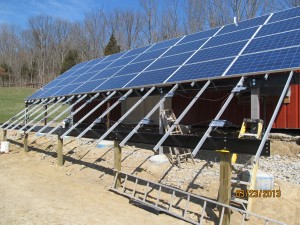
DIY Solar expansion -adding 2 more rows to bottom of 32 panel array.

After we finished the 32 panel array, George saw that some minor grading of the ground near the bottom would allow plenty of room for 2 more rows! A week later he called me and said “Hey Joe, come on out and lets get these 2 rows installed – tomorrow’s weather looks great. So we did!  When I ordered the extra components, we also added 8 more rails – one under each of the 8 columns of the upper 4 rows. You can see them mid-panel in the picture to the right. This provided the extra strength and rigidity that the span required for both wind and snow loading. Splicing the extra rails that extend to the newly installed lower beam also provided a counterbalance to the free span above.
The two missing panels at the lower left were intentionally left off because of a stone access road to the hay barn that George didn’t want to move.


DIY Solar install of Enphase M215 Micro-inverters

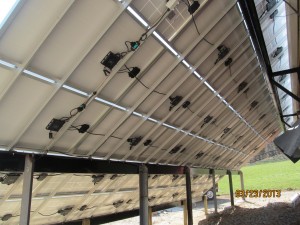
DIY Solar installation of Enphase M215 Micro-inverters.

This is what the backside looks like after everything is in place. After the rails were set, the Enphase M215 Micro-inverters were mounted. Then the #6 bare copper ground wire was run in series to each inverter. We grounded BOTH ends of the #6 copper, just because we could. Next came the Enphase TRUNK Cable, mounted with stainless steel clips to the rails. Then the panels were added, the micros were plugged in to the trunk cable and the panel leads connected to the micros. One end of the trunk cable is sealed with a weather tight cap, and the other goes to a weatherproof junction box (white) to transition to standard exterior rated 12-3 with ground romex. The romex connects to a breaker box with a 20 amp 2 pole breaker for each string of 16 and 1 string of 14 panels. Then, the entire array is nicely dressed using tie wraps so that all the wiring is suspended between the panels and the bottom of the rails to keep it from whipping in the wind or getting snagged by anything.


Power panel mounted below array

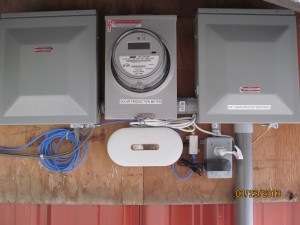
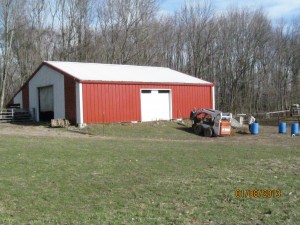
Power Panel beneath the array, mounted to the side of the hay barn.

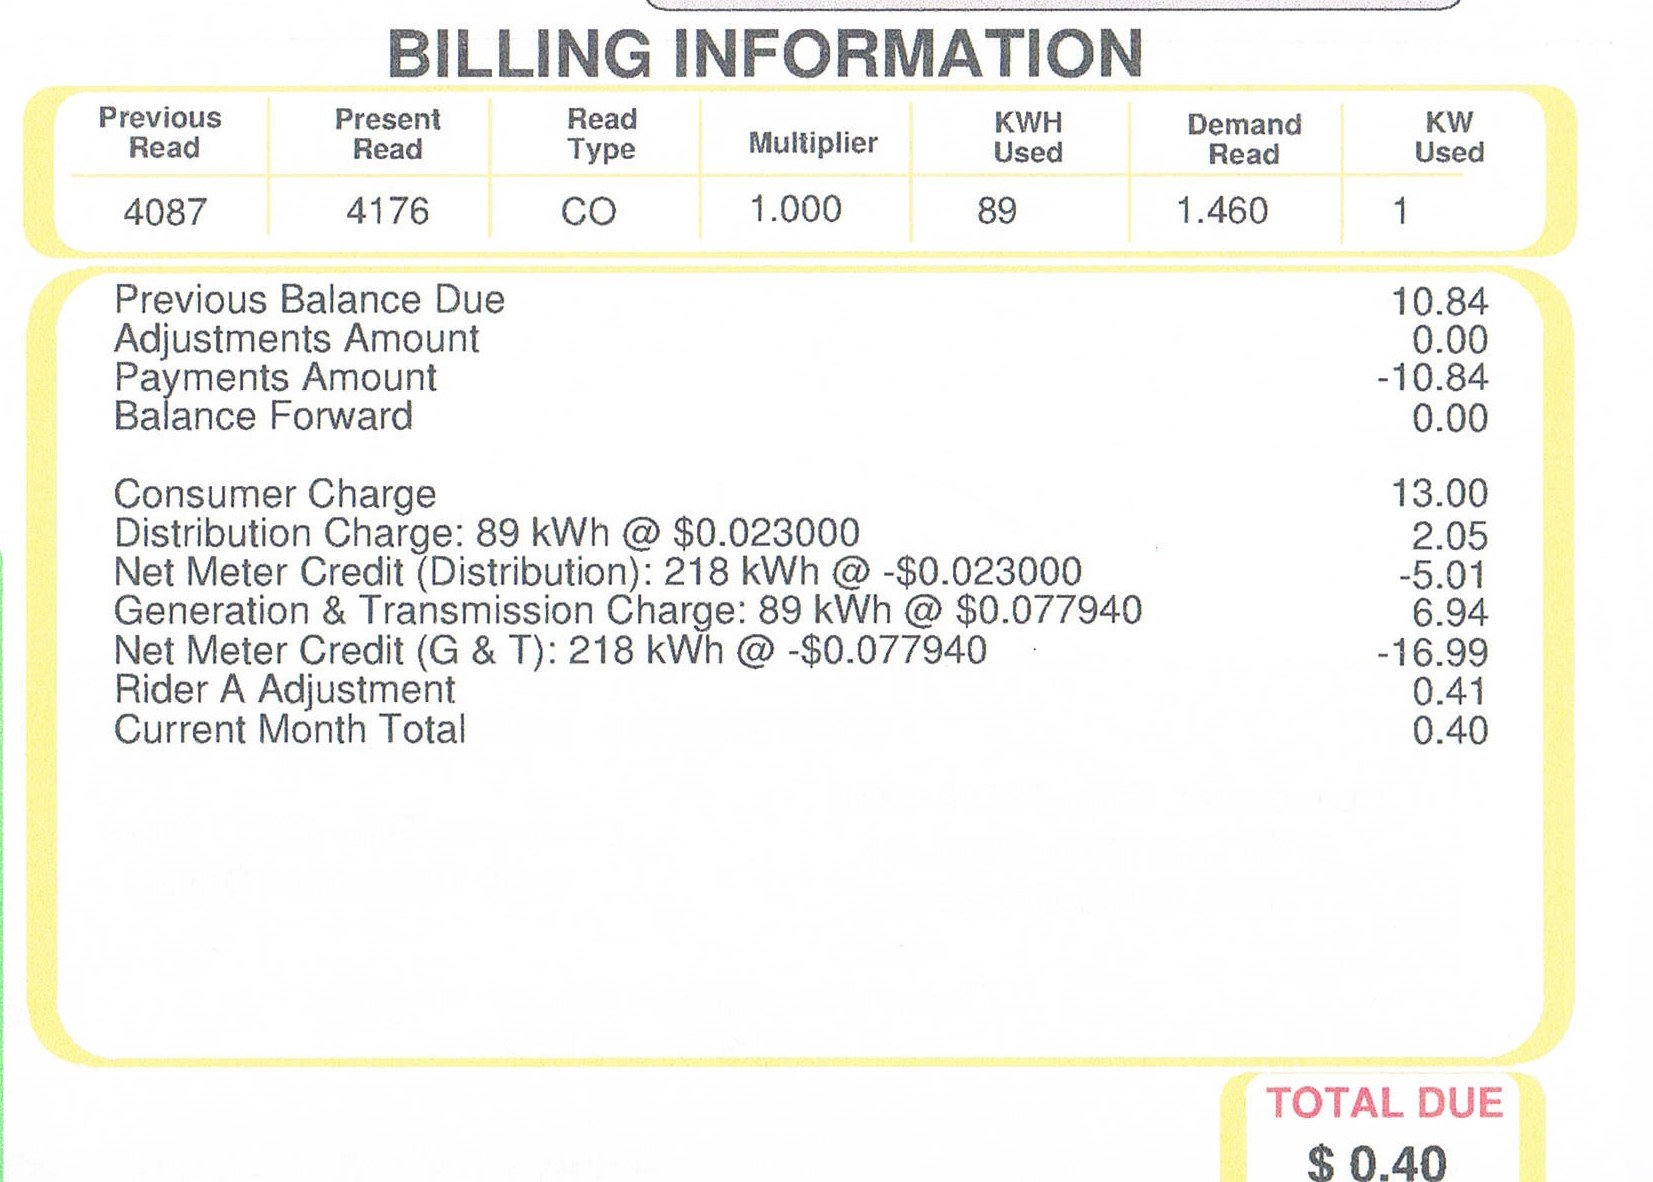
Here’s the power panel. Public Utility Commission in Ohio says any array over 6Kw must be metered by a UTILITY GRADE meter. Got one on Ebay for $35. Breaker box on left contains the 3 solar breakers. That feeds through the meter to the master breaker box on the right. Master breaker box connects to the utility grid via a buried conduit over to the other barn that had power in it already. Below the utility grade meter is the Enphase ENVOY monitoring unit that ties all this to the internet so George can watch things from his home computer. He can share a link with his friends as well. I’ll post this link soon as I get it from George! The Utility voltage here is rather high – close to the limits for most inverters, at 254Vac. This causes a few of the inverters to occasionally shut down (to protect themselves). I’ll be looking into this further on my next visit to see how we might correct this…


Almost finished array by Cinci Home Solar

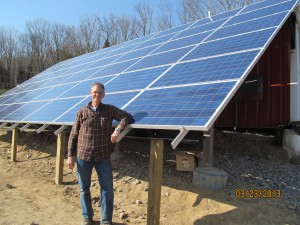
Almost finished DIY solar array accomplished with a little help from Cinci Home Solar!

Here’s the finished array. Still need to trim the excess rail length at the bottoms. If you look close, you might just spot some mis-alignment within the array. George got 2 pallets of panels. Same part number, same vendor, but one pallet was 1/2 inch shorter on the long side (out of spec…). We didn’t catch this till 5 were mounted in the top row. George, being a prudent and thrifty fellow, called the panel supplier and negotiated a compromise that didn’t require a return of the panels. The size only affects the esthetics slightly, and a cost reduction is pending!  The Enphase ENVOY normally communicates over the power lines, but there’s a half mile of them back to the house and that’s too far for it to work, so I added an Engenius EOC-1650 at the house as an access point, and atop the array as a client/bridge. It works great – with 100% signal integrity, and also provides WIFI to his customers and visitors! The EOC-1650 is that little white gadget at the top right of the array.

Beginning new Array Construction

Beginning work on a DIY 32 panel Solar PV CANOPY installation

This 45 foot hay barn will gain a solar CANOPY extending from the South face just above the rain gutter.

This simple 45 foot hay barn on the East Side of Cincinnati is the location for a 32 panel PV SOLAR CANOPY.

With my help, the owner of this 32 horse boarding stable will erect a massive solar canopy that will cover about 80% of his electricity usage. It will include two Sunny Island battery powered inverters for off-grid backup capability.

This stable is located at the end of a long country road, and it seems he is always first to lose power and last to have it restored. Watering the horses is important to their health, and the backup system will keep trough heaters and well pumps operating when the weather is at its worst in terms of outdoor temperatures.

24 inch Auger on Bobcat makes DIY SOLAR hole digging easy!

This 24 inch auger accessory makes drilling the foundation holes an easy task

We were very lucky on this installation, since the property owner had a small bobcat and an augerattachment with a 24 inch bit. The array will measure 13 feet tall by 42 feet wide, which is more surface area than the wing of a regional jet!

This makes it doubly important to anchor the panel mounting structure to mother earth! The property owner is a bit of a scrounger, and he had a nice supply of 1/4 inch thick X 4 inch angle iron for the front row support legs. This will be capped by an S shaped steel beam across the front and rear row. Standard UNIRAC solarmount 160 inch rails will then carry the panels. Brackets attached to the barn vertical wall beams will carry the rear steel rail. Prevailing winds are directly from the south/southwest so the majority of wind loading will be in a downward direction. The steel angle iron and 24 inch concrete columns exceed the requirements needed to achieve the 90 MPH wind rating for the array. AND, the owner saved a bundle since he had the parts on hand!DIY SOLAR Hole

Why bother to take a picture of a hole in the ground? Depending on the jurisdiction and how it works in your area, you may need an inspection BEFORE your pour, so that hole depths can be validated, to assure safe anchoring of the ground mount array. In this case, the property is zoned AGRICULTURE, and inspections are not needed. But just to be safe we documented the depth of every hole. Paperwork can be a pain, but documenting your actions can be worth it’s weight in gold if problems crop up down the line somewhere. And, above all, if you are unsure of where you’re digging, CALL BEFORE YOU DIG. If you need them, GET PERMITS as well. They might be a bit of a hassle, but they are there for a reason – mostly to protect YOU from getting in trouble. Your solar array will be productive and last for MORE than 25 years, so take your time and do things RIGHT the first time!IMG_1826 
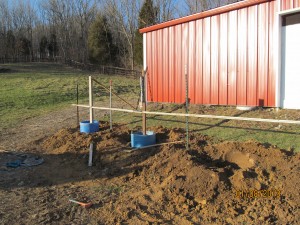
So here is where we left the project yesterday.

Those blue forms for the concrete area 50 gallon polyethylene barrels that can be had for about 5 bucks apiece. Cut the ends out and they make forms that will last forever. metal posts and cross beams provide some stability for the steel angle beams that will form the front supports for the array. I’ll add more posts as the project moves along.

It IS January, and weather can always be an issue, but this DIY SOLAR enthusiast plans on seizing every opportunity to get this array completed an online as soon as possible to start reaping the benefits that PV solar can provide!!

Lightning Arrestors. Use them!

I’ve never discussed this, but these devices are cheap insurance (not really, but you get the idea…) against all kinds of problems that can come about as a result of electrical storms. I’ve used the powered type in the past, and have one installed currently, but I came across a totally passive version that uses no power, is self resetting, and if it does fail, it fails OPEN, so it won’t cause problems. Best of all, you can get them for 30 bucks on ebay, brand new, including shipping. Just search for “LA302R”.  It has 3 wires, and you simply install it in your electric box to a breaker connected to L1, L2 and Neutral. If you’re not an electrician, hire one to do this. It takes about 2 minutes. It takes longer to get the cover off your breaker box than it does to install one!!

This is a good time to be shopping for solar panels

Check out this 1 page report regarding current market interest in solar panels. Solar Panel Market Survey It shows the interest falling off slightly for this time of year, but it mentions that China is working to provide buyers with incentives (read that to be even better pricing!!). Just thought I’d share this with my followers. Now is a great time to buy panels. 235 to 245 watt mono and poly panels are selling between .80 and .90/watt in pallet quantities. Pallets usually hold between 24 and 29 panels, depending on supplier and brand of panel. Sellers don’t like to “break” pallets, since they don’t have a good way to store or keep track of loose panels in their warehouses. You can always sell extra panels (at a markup!!) on Craigs list, or partner with a neighbor and split the shipping costs. Shipping (truck freight) can run anywhere from $200 to $450, so don’t be afraid to ask for a BETTER DEAL on freight when you are making a purchase!

Video interview at the Enphase booth at SPI in Orlando

I had the good fortune of getting invited to the Solar Power International trade show in Orlando Florida a few weeks ago, and while there I did a few interviews with the great guys at Enphase. In my off-time, I was able to see the show, visit all the manufacturers of the products I use when helping my DIY customers, and get lots of questions answered. Specifically, I was researching GROUND MOUNTS which range from small and affordable to massive and huge for utility size jobs. There are an amazing number of ways to fasten an array to the ground!! More than I ever imagined! Anyway, here is a link to one of the interviews I did for Enphase. Enphase Interview with Joe

What it takes to keep your power UP when the grid is DOWN!

It’s been a long time coming, and I’ve been hesitant to make the investment, but recent power outages caused by the weather, combined with the state of affairs around the globe, have given me the motivation to finally make it happen. Please come back here at least twice a month to check my progress on this project! I’m doing this at my “bunker” in the mountains of Ohio. I’ve already got a 2400 watt system running using the older Enphase M190 micro-inverters along with 12 assorted PV Panels, and it’s covering 90 to 100% of the electric bill. But, I lost a refrigerator full of food when the power was down for too many days… so, I’m adding all the parts to keep the power flowing when the grid is down! Here’s a list of the parts I’ve got on the way:

  • Magnum Distribution panel 250/30A-2P
  • Magnum MS-PAE 4024AE 4kW 240VAC Pure Sine Inverter
  • Magnum LCD Remote Panel (for programming and monitoring inverter status)
  • Magnum BP-MMP Metal Mount for MMP enclosure and inverter
  • ROLLS 6V 530AH Wet 40000S EKG Battery (X4=24 Vdc)
  • Battery Box fan 24volt, 6 CFM
  • ROLLS R+ Recombination Caps (X12) keeps battery watering to a minimum
  • Outback Spill Control Tray for the batteries – in case of a case crack or acid spill
  • #4/0 gauge flex wire with lugs for battery interconnections and inverter hookup

There’s also a whole house SMART SWITCH and some other parts to modify the incoming service wiring…

That pile of parts is worth about $4500 if you’re considering doing this. Well worth the price if the grid goes down for ANY reason! I’ll take pictures as I go and do updates to describe my trials and tribulations!
DIY Solar is affordable and reliable ( and a great way to prepare for Zombie Armageddon ) just kidding… and have a SUNNY day!

POLLEN can reduce your solar output!

I’ve not been on the roof to clean my panels since I put them up last July. This past Spring, I had to wash my car twice to get rid of a sticky yellow buildup of pollen, but it didn’t occur to me that this same pollen could be on my panels. Imagine my surprise when I went up there and found the entire surface of all the panels to be COVERED with pollen – it was like 150 grit sandpaper! This most certainly caused the light to diffuse and reduce the amount of solar energy impacting directly on the solar panel glass!! About 15 minutes with a bucket of soapy water and a cleaner/squeegee made them good as new. Solar output increased immediately by about 5% compared the the day before (both days equally sunny with no clouds). Moral of the story: if you want max power, you need clean panels! If you can reach them with a stream of water from a hose, do this regularly to prevent buildup of dirt and pollen!