Adding battery backup – even if you DON’T have solar!

It’s been a while since I posted any new activities – but only because I’ve been so darned busy! A client in Harrison Indiana wanted a a solar system installed, but he launched his project too late in the year, so rather than fight the weather, we decided to just install the BACKUP portion of the project ahead of time – giving him the benefit of a backup system for the upcoming Winter season. He lives out in the country, and encounters frequent power outages during the winter months, so this was a good compromise, and that’s what this blog entry will be about.

We decided to go with the new OutBack RADIAN 8Kw inverter and the Outback AGM batteries, since they don’t require watering or venting. He had space on the wall where his current Main breaker panel was located, so we just expanded with some extra plywood. We hung the inverter and mounted the battery bank directly below it so that we would minimize the distance the 4/0 Battery cable would need to cover.

Current position of existing main breaker panel

Main panel location at start of project. Room to the right and below.

With that plan in mind, I went in search of some 1 inch plywood, which it seems none of the lumberyards carry. I got the lumberyard to precut a 4 X 8 sheet of 1/2 inch thickness, and managed to squeeze them into our PT cruiser. A couple squirts of glue and some 3/4 drywall screws to hold them together got us the mounting plate we needed for all the things we were going to add: a SUPPORTED LOAD panel – this is the loads that will be backed up when the power drops, another outlet for the freezer next to this panel, and the OutBack MATE3 control center that lets us program the Radian and observe the voltage and operation visually.

The MATE3 also provides the interface to the internet so that this can all be monitored from a PC on the web. We planned on adding solar this year when the weather warmed up, and the Radian PREWIRED INTERFACE took all the hassle out of making this all work. THe interface is directly below the Radian in the next photo. Everything inside this prewired box is clearly labeled and it would be VERY hard to get it hooked up wrong!

OutBack Radian Inverter Mounted

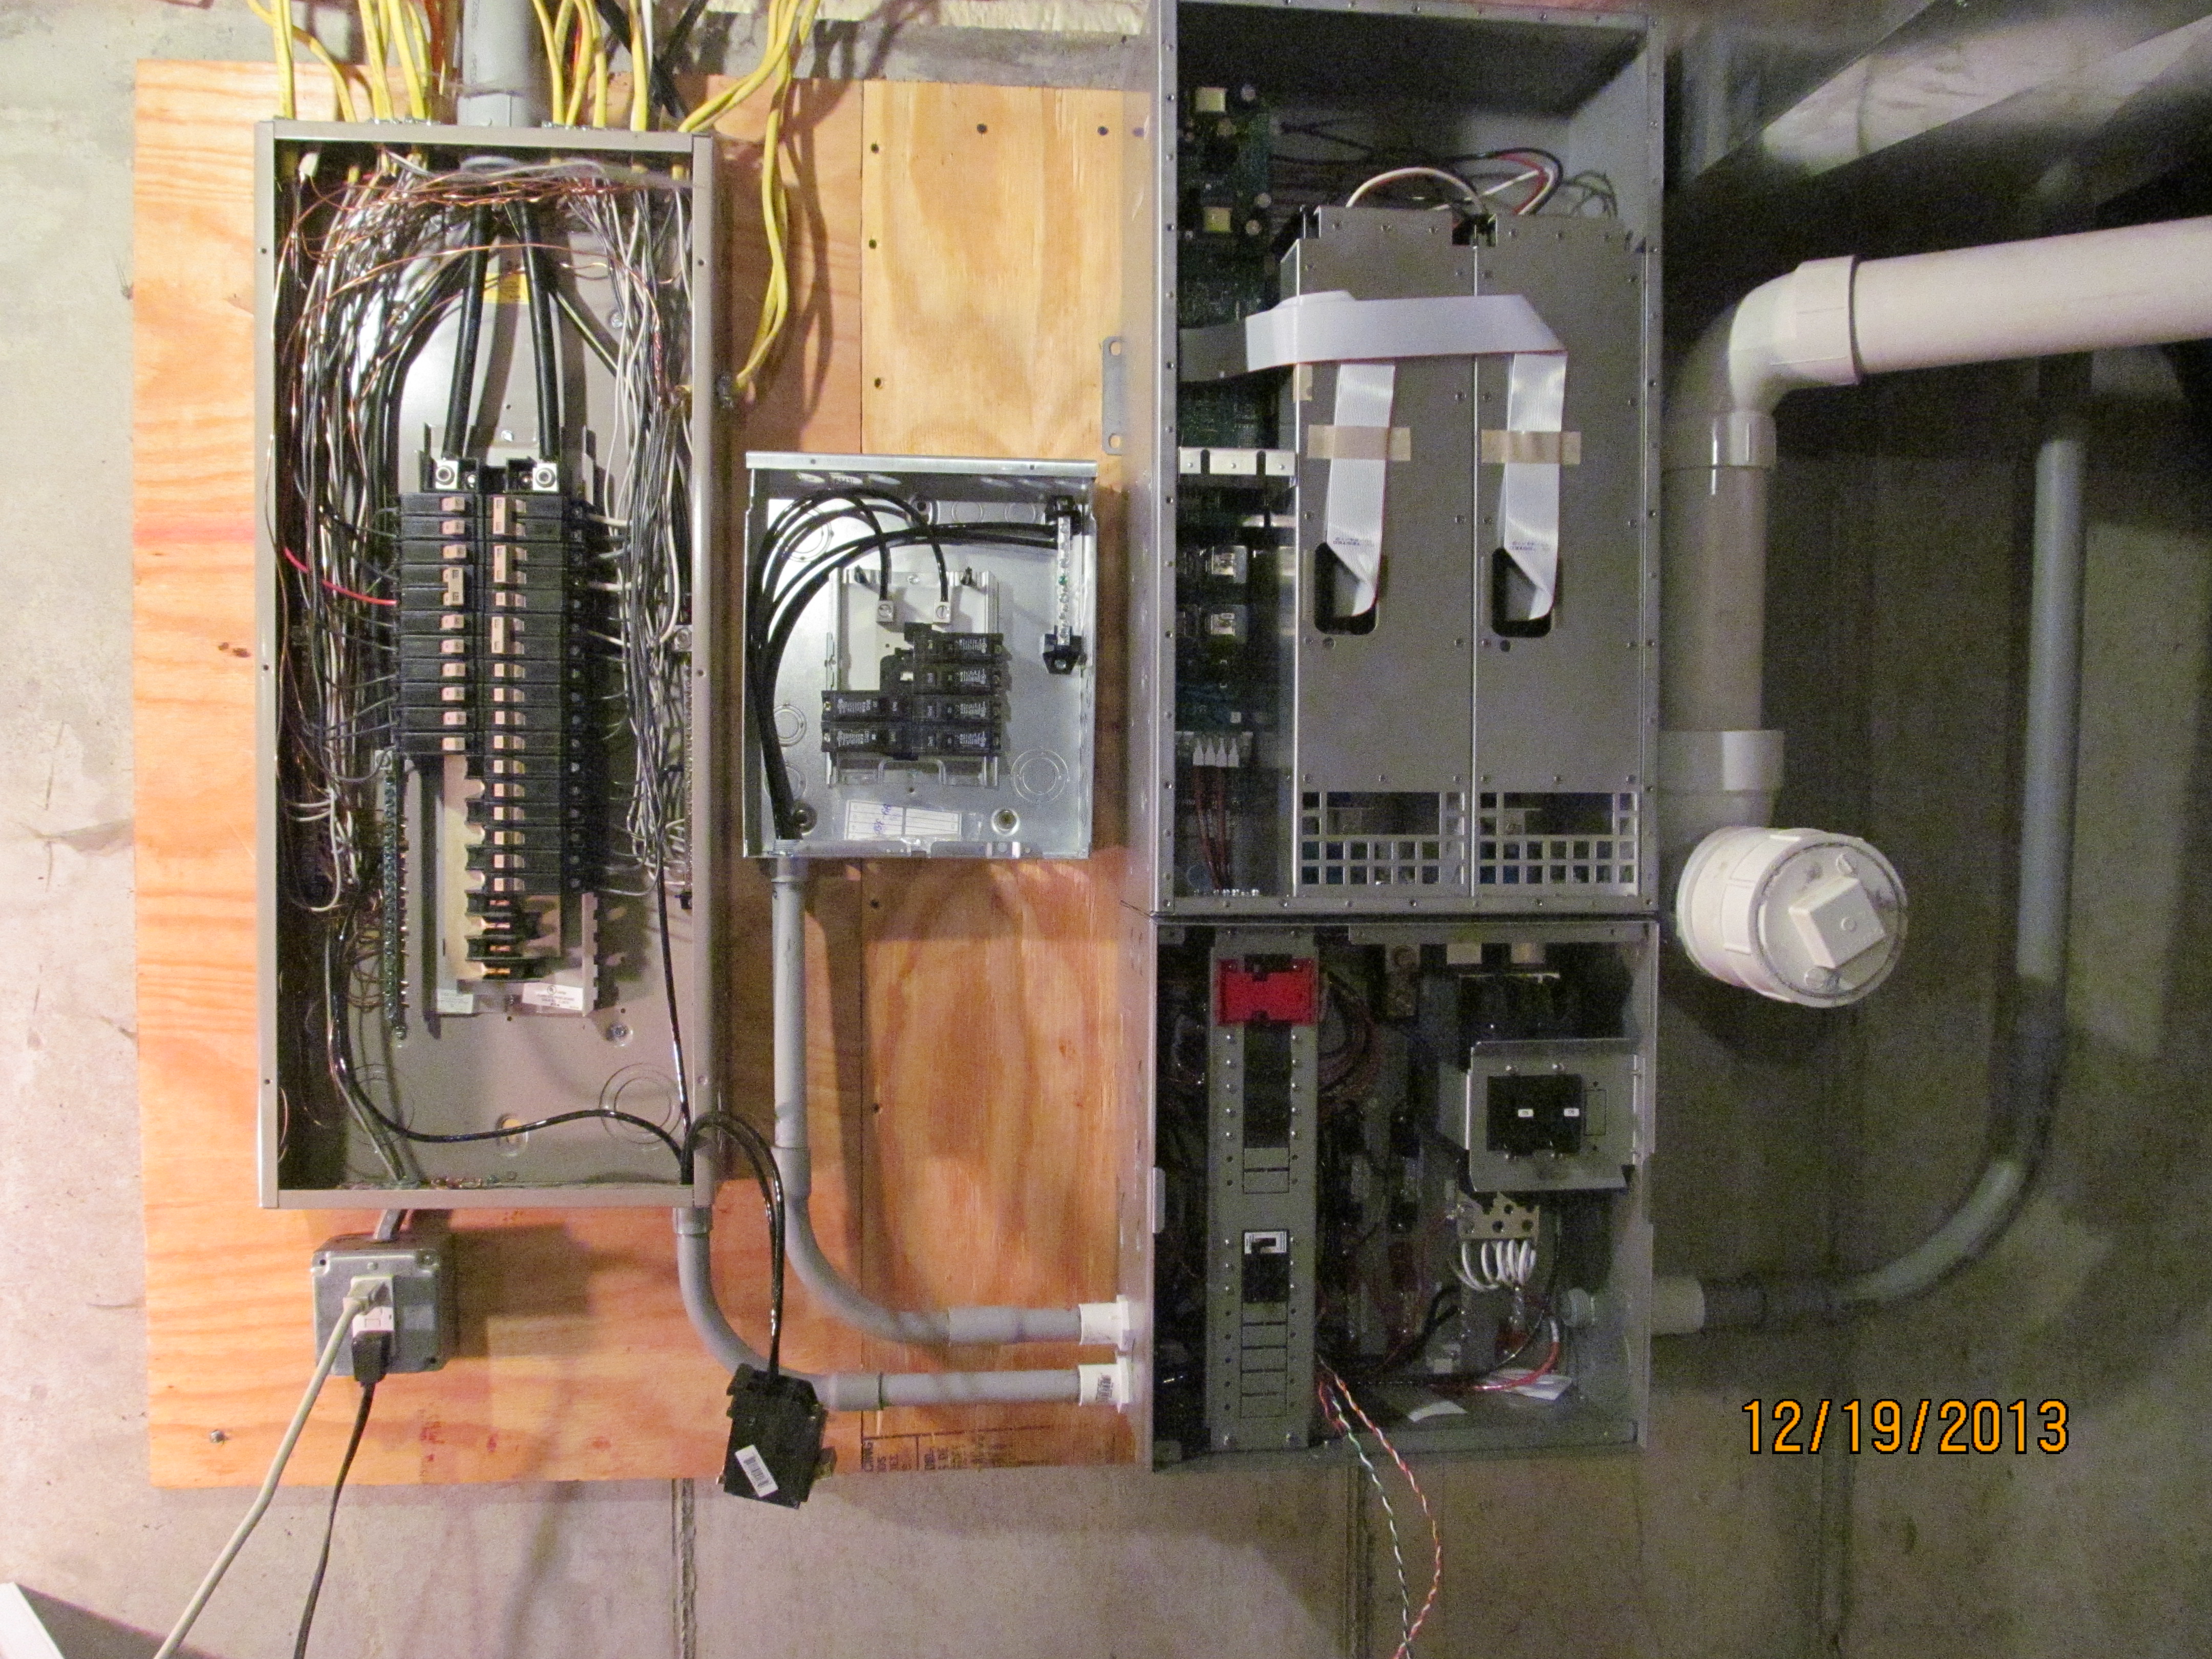
New plywood backer, Radian (top) and prewire box (bottom)

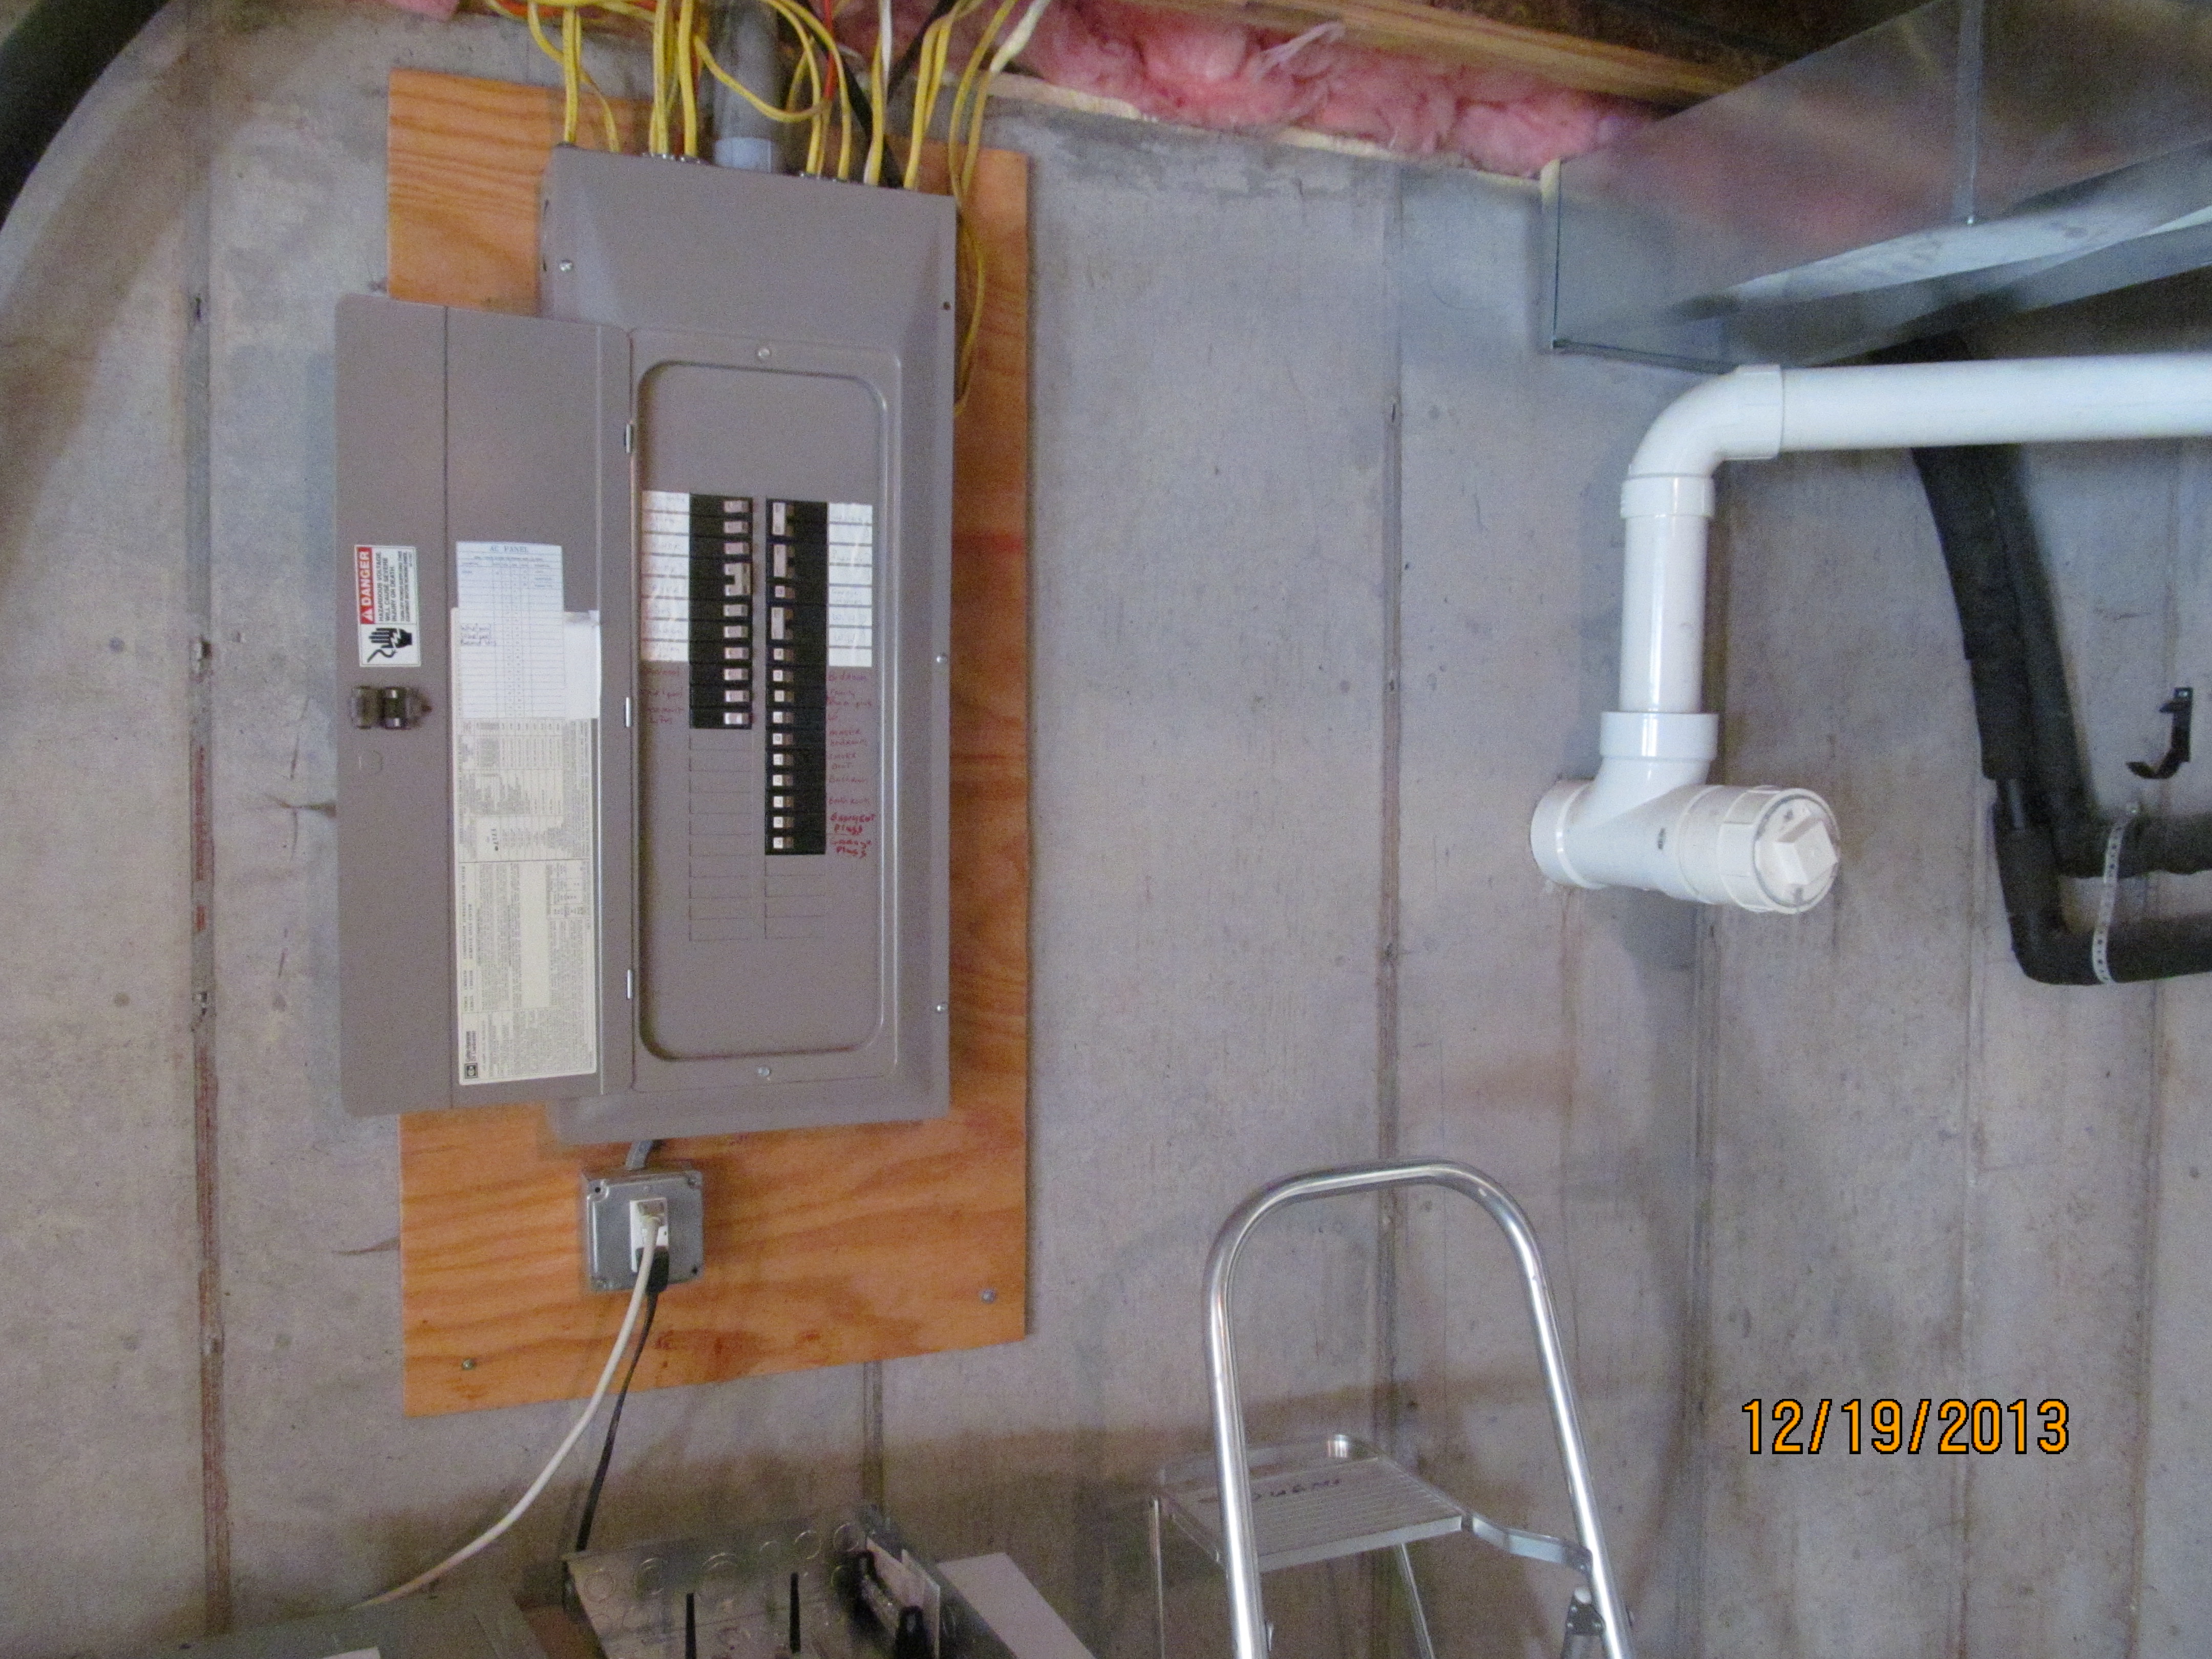
The next step was to move the breakers and wiring for the supported loads from the main panel (at the left) to the supported load panel (in the middle). The lines were too short by a couple of feet, so I went to the electrical supply house and found some neat nylon splice blocks that have compression screws and they come in big strips of 20 or 30, so I could cut them into blocks of 3. This allowed me to splice new romex (same gauge) to the black, white and copper ground wires in a manner that was safe and in compliance with the National Electrical Code.

The wood backing also allowed me to screw the splice blocks in place at the top of the board (out of reach) to keep things safe. Please notice that all connections between the breakerboxes, the inverter and anything else on this board are all in conduit. The only exception is the Romex, which by code is allowed. Just remember that EVERY line of romex going into the supported load panel MUST have a strain relief. You just can’t run wires through the holes in the box – it would NEVER pass an inspection!

Outback AGM Battery bank

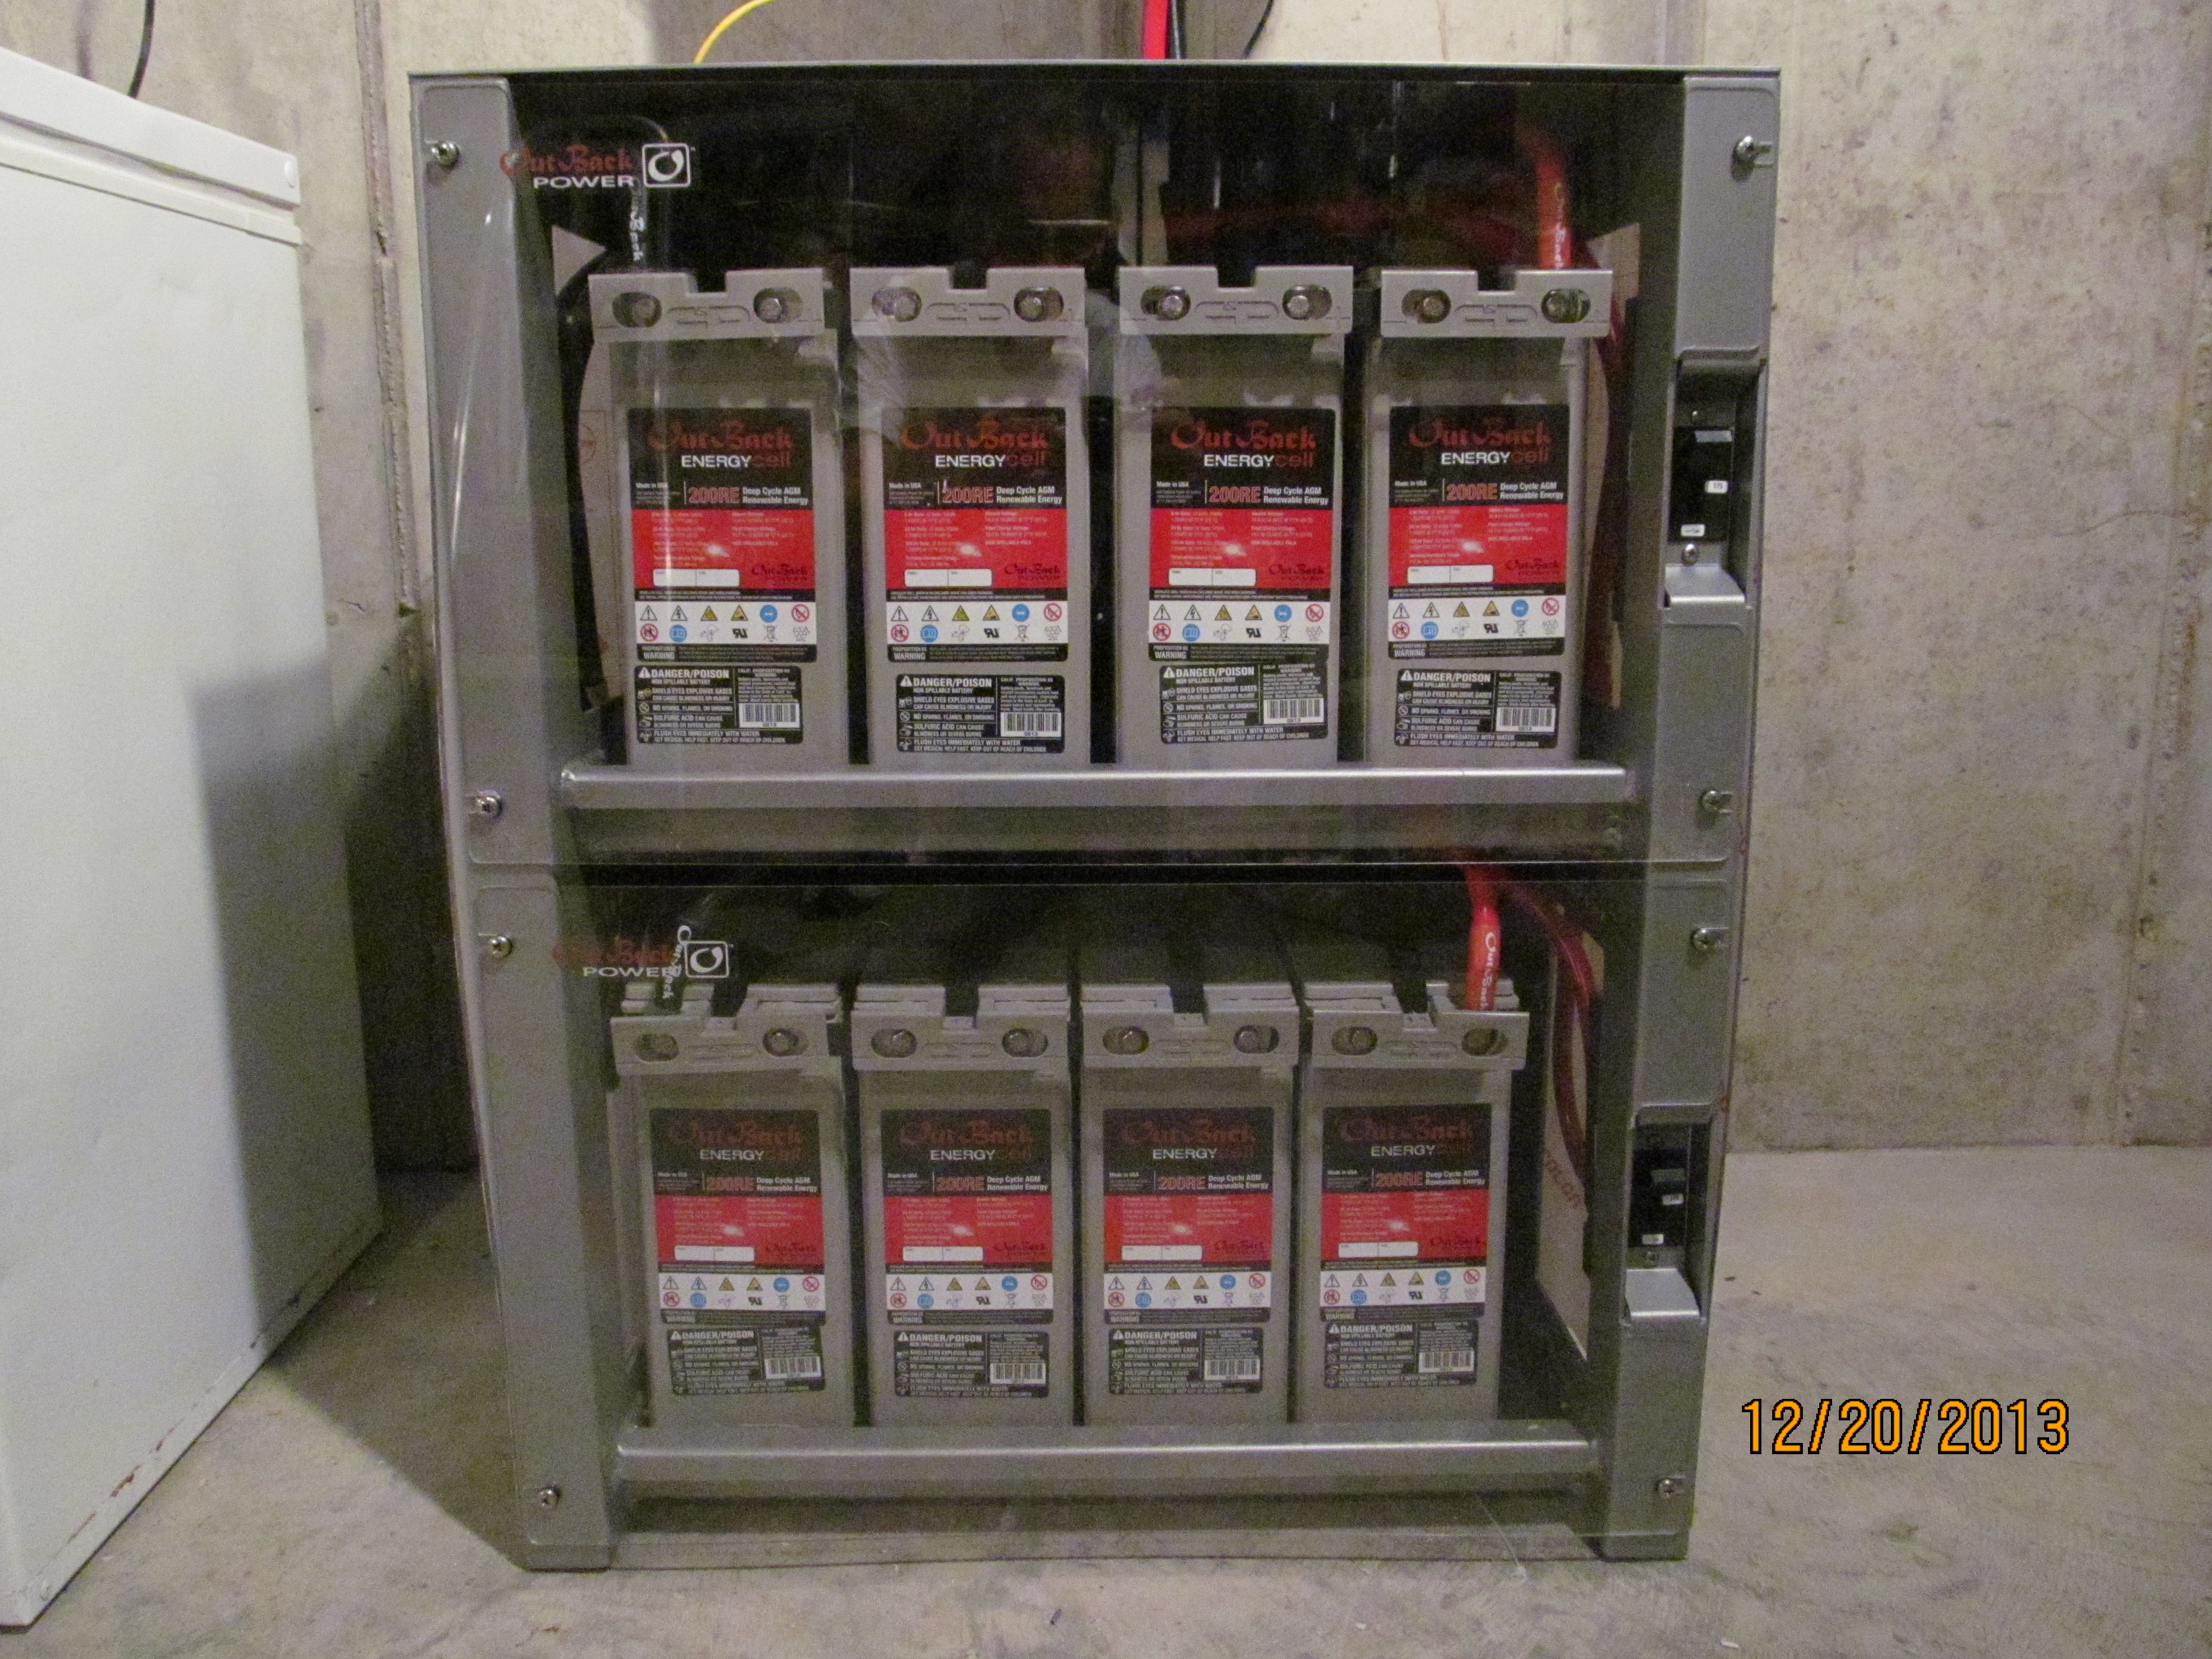
Outback AGM battery bank. Great for no-worry storage!

While I was doing all that wiring, the homeowner was busily assembling the battery cabinet and installing the OutBack AGM (sealed lead acid gel type) batteries and all the jumpers to create the battery bank. There are two banks of four batteries, which are then paralleled to achieve a sizeable AmpHour capacity.

These batteries are not cheap, but they don’t require any attention like checking fluid level, or requiring a vent fan, so it simplifies the installation and use of the system. By the way, if you want a closer look, just click on the photos and you will get a full screen size view.

If you look close you’ll find that there is a 175Adc breaker for each ROW of batteries in the cabinet. This will come in handy troubleshooting in the future. It also keeps things safe while connecting the battery cables. The cable used in this setup is high strand count 4/0 with FACTORY TERMINATED ring ends. No, you CAN’T use welding cable, and don’t even THINK about putting ends on by yourself.

Always purchase SOLAR battery cables that are pre-terminated by your supplier. During normal operation DC current out of the battery can reach peaks upwards of 500 to 1000 AMPS. Any weak or loose connection will get hot and create a problem in no time!

Installation almost complete

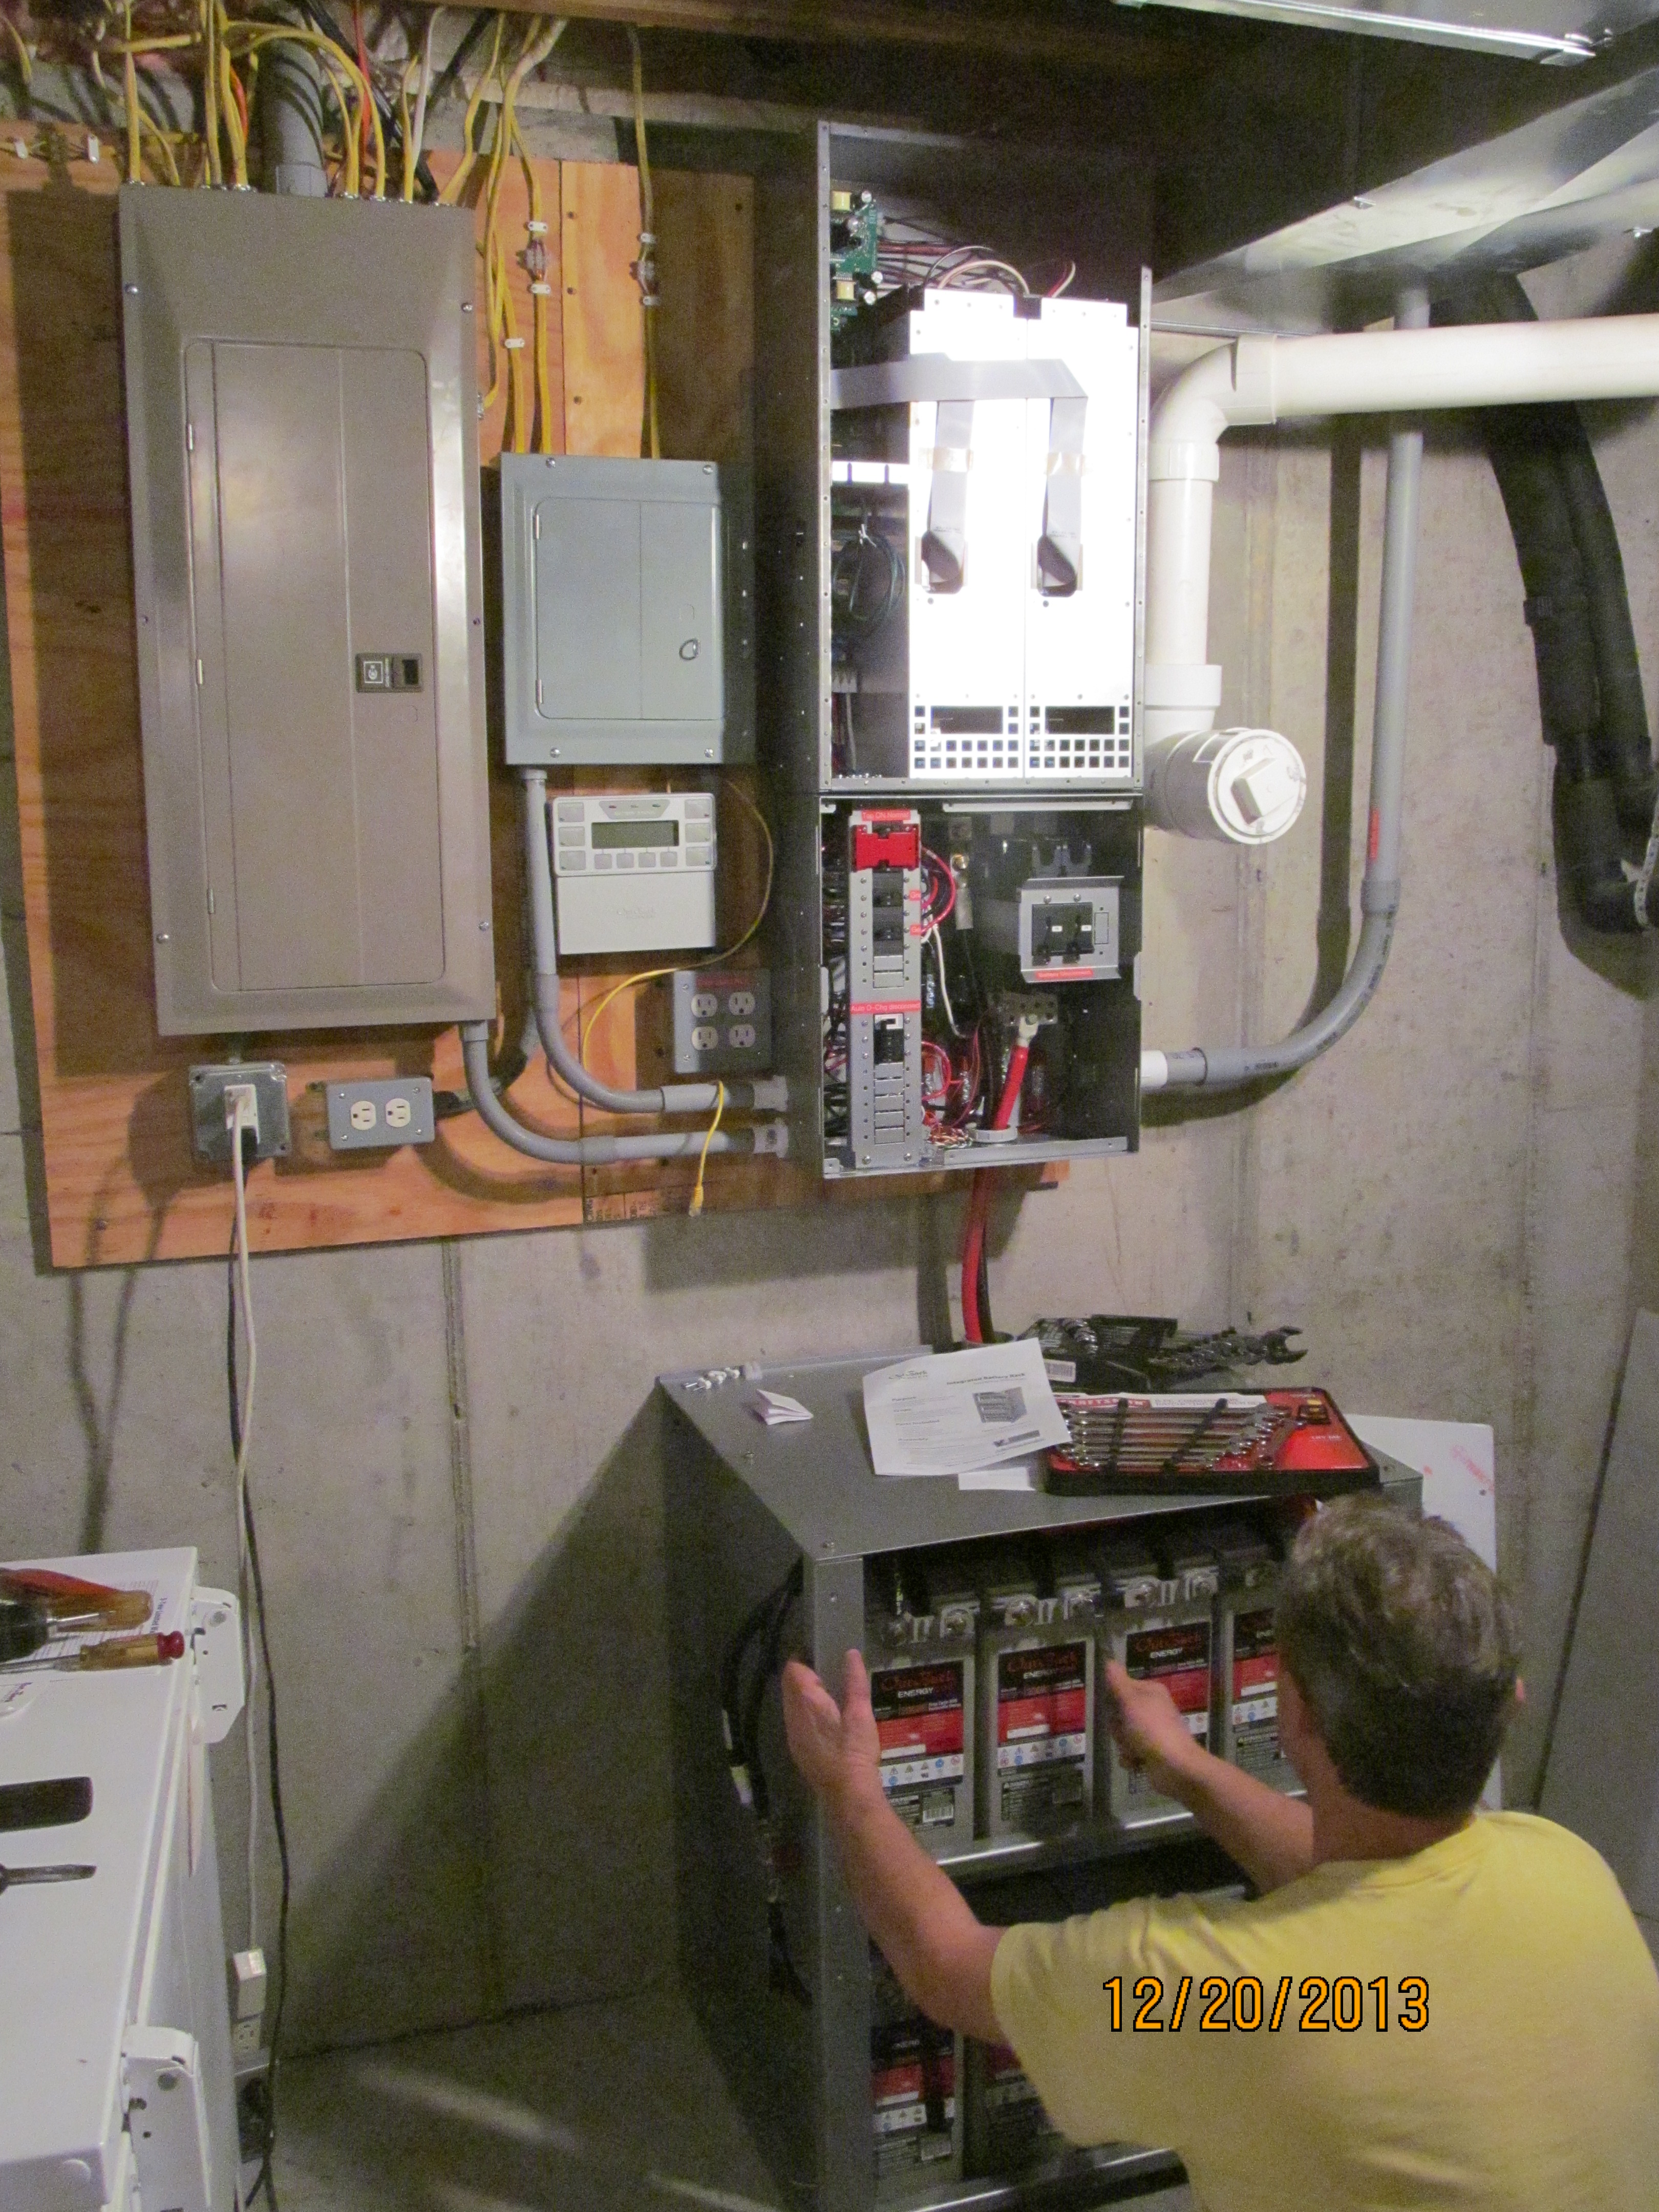
Almost ready to turn on. No feed from the solar just yet.

Here’s the finished installation – just a few more lines to move from the main breaker panel over to the supported load panel. If you click on the photo, and zoom in, you can just make out those splice blocks I was talking about at the top. There was just enough room below the supported load panel to mount the Mate3, and the finished installation looks pretty nice with all the brushed steel panels and covers re-installed.

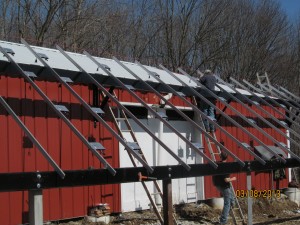
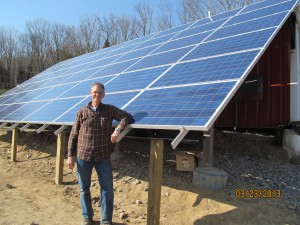
Other than the battery cabinet, the backup system didn’t take any additional floor space, so it was not a problem where we placed everything. The homeowner still needs to run an ethernet cable down a chimney chase from upstairs to put the system online – another project for a rainy day. I went back in the early Spring of this year to install the ground mount and a sunny boy inverter at the back of the property.

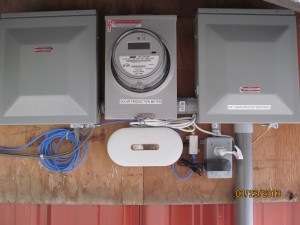
This is an old farm, and the service is sort of snaked around the property. By intercepting the feed to the barns, we will be able to redirect them THROUGH the RADIAN INVERTER PREWIRE BOX, and effectively create an awesome GRID BACKUP system that will operate AND Charge the batteries when the utility power is down. In Bright sun, we have 8KW from the inverter/battery bank COMBINED with 5 to 6KW of realtime solar power to run some BIG loads like AC or the washer/dryer.

If you look back at the 2nd picture, you can see TWO large boxes with cables coming from them. These are two 4Kw inverters. The RADIAN design is redundant- if one quits, you still have power, just 1/2 power. That’s better than NONE when the power is down. I think this is the best feature of the radiant design!

Our power costs are CHEAP here in the MidWest!

I just read a blog at my friend’s website (www.runonsun.com) and learned that folks in California are paying 22 Cents/Kwh for their electricity. That’s over TWICE what we pay here in the MidWest. This is very likely the reason there’s so much residential solar built up out West. Our energy prices here in Ohio, Indiana, Kentucky and Pennsylvania are all around 10 cents/Kwh, and we are blessed. But don’t think that our prices won’t go up. Coal fired plants are being closed every week because they are old, obsolete, or simply can’t meet the new EPA standards for particulate emissions. Yes, there are new gas turbine power plants being built, and yes, we are using LESS electricity (as a Country) than ever before, but this is not a balanced equation. Our prices have been held low due to coal subsidies from the government, and these will disappear with the coal plants. Solar panel pricing has bottomed out and prices are stabilizing in the 79 to 90 cents/watt range. We might squeeze a few percent out of inverter costs, but for now, we are riding near the all time price lows for residential AND commercial solar PV systems. It might be time to plan on installing that dream system in the early Spring, before demand begins to force component pricing to rise…

Best wishes and sunny days!
Joe

Warrantee work at East Fork

Had a small problem with an SMA Sunny Island grid backup inverter (6KW). After sending SMA the Smart Card data, they promptly sent out a replacement and even included return shipping! Back up and running and customer is a happy camper once again. Based on this event, I would highly recommend you look at the SMA Sunny Island if you’re planning a Grid backup or even OFF-grid system! Sorry, I forgot my camera this trip!

Finish phase 2 expansion at East Fork Stables

Racking goes up at East Fork Stables

Cinci Home Solar works with EFS to get racking up using 50% on hand materials.

Missed this photo on the first part of this adventure. The owner had materials on hand, and made the posts of Steel L channel, the beams from Steel S-channel, and the barn support brackets from 2 inch steel L material. The owner (George) is a VERY resourceful fellow – some might call him a scrounger, but I call him SMART! I passed along a great vendor deal on the solar panels and he purchased them direct. The BOS (balance of system) materials was purchased through Cinci Home Solar at great pricing, bringing the whole project in at about $3/watt, and this includes the battery bank and backup power inverters in addition to the Enphase micro-inverters behind each panel. The work was spread over 4 full days, with the helper crew varying from 1 to 3 guys and myself. Plenty of manpower to get this rather large project done in a timely fashion. Winter is really variable in Cincinnati, and whenever the weather was predicted to be above 40 and sunny, George called and we got the job done. Fortunately, this job was a quick drive from my home, and it wasn’t a problem. Normally, these 3 or 4 days would have been all condensed into one extended visit! I aim to please, whenever possible…


DIY Solar array expansion by Cinci Home Solar

DIY Solar expansion -adding 2 more rows to bottom of 32 panel array.

After we finished the 32 panel array, George saw that some minor grading of the ground near the bottom would allow plenty of room for 2 more rows! A week later he called me and said “Hey Joe, come on out and lets get these 2 rows installed – tomorrow’s weather looks great. So we did!  When I ordered the extra components, we also added 8 more rails – one under each of the 8 columns of the upper 4 rows. You can see them mid-panel in the picture to the right. This provided the extra strength and rigidity that the span required for both wind and snow loading. Splicing the extra rails that extend to the newly installed lower beam also provided a counterbalance to the free span above.
The two missing panels at the lower left were intentionally left off because of a stone access road to the hay barn that George didn’t want to move.


DIY Solar install of Enphase M215 Micro-inverters

DIY Solar installation of Enphase M215 Micro-inverters.

This is what the backside looks like after everything is in place. After the rails were set, the Enphase M215 Micro-inverters were mounted. Then the #6 bare copper ground wire was run in series to each inverter. We grounded BOTH ends of the #6 copper, just because we could. Next came the Enphase TRUNK Cable, mounted with stainless steel clips to the rails. Then the panels were added, the micros were plugged in to the trunk cable and the panel leads connected to the micros. One end of the trunk cable is sealed with a weather tight cap, and the other goes to a weatherproof junction box (white) to transition to standard exterior rated 12-3 with ground romex. The romex connects to a breaker box with a 20 amp 2 pole breaker for each string of 16 and 1 string of 14 panels. Then, the entire array is nicely dressed using tie wraps so that all the wiring is suspended between the panels and the bottom of the rails to keep it from whipping in the wind or getting snagged by anything.


Power panel mounted below array

Power Panel beneath the array, mounted to the side of the hay barn.

Here’s the power panel. Public Utility Commission in Ohio says any array over 6Kw must be metered by a UTILITY GRADE meter. Got one on Ebay for $35. Breaker box on left contains the 3 solar breakers. That feeds through the meter to the master breaker box on the right. Master breaker box connects to the utility grid via a buried conduit over to the other barn that had power in it already. Below the utility grade meter is the Enphase ENVOY monitoring unit that ties all this to the internet so George can watch things from his home computer. He can share a link with his friends as well. I’ll post this link soon as I get it from George! The Utility voltage here is rather high – close to the limits for most inverters, at 254Vac. This causes a few of the inverters to occasionally shut down (to protect themselves). I’ll be looking into this further on my next visit to see how we might correct this…


Almost finished array by Cinci Home Solar

Almost finished DIY solar array accomplished with a little help from Cinci Home Solar!

Here’s the finished array. Still need to trim the excess rail length at the bottoms. If you look close, you might just spot some mis-alignment within the array. George got 2 pallets of panels. Same part number, same vendor, but one pallet was 1/2 inch shorter on the long side (out of spec…). We didn’t catch this till 5 were mounted in the top row. George, being a prudent and thrifty fellow, called the panel supplier and negotiated a compromise that didn’t require a return of the panels. The size only affects the esthetics slightly, and a cost reduction is pending!  The Enphase ENVOY normally communicates over the power lines, but there’s a half mile of them back to the house and that’s too far for it to work, so I added an Engenius EOC-1650 at the house as an access point, and atop the array as a client/bridge. It works great – with 100% signal integrity, and also provides WIFI to his customers and visitors! The EOC-1650 is that little white gadget at the top right of the array.

Back up system going in soon!

I’m stoked! My solar buddy, Brock, is going to help me pull new wires in from the meter outside the house down through, and to, the whole house smart switch, breaker box and Magnum backup inverter & battery bank this coming week! Will take a bunch of pictures when it’s done. Working with 3 other clients now on similar systems. One will even have a generator tie in! I can’t tell you where it is, but maybe I’ll be able to post some equipment pictures of the gear when we get that far. Right now it’s all in the planning stages. He’s going ALL the way off the grid! Me, I just want to get through a couple days of zombie armageddon… (just kidding!)