26% Federal Solar Tax Credit has been extended.
The Federal Government passed a bill extending the 26% solar investment tax credit (ITC) until 2030!
And the credit now includes BATTERIES!

The Federal Government passed a bill extending the 26% solar investment tax credit (ITC) until 2030!
And the credit now includes BATTERIES!
This post will be about batteries. ALL types!! There are literally DOZENS of battery chemistries out there. I will talk here about the 6 or 8 MOST USED types, and let you know which are the best, and which are the most expensive. Funny, it’s not just the purchase price that matters,… From a common sense standpoint, the battery LIFE is important and the right way to calculate cost is on a $ per charge/discharge cycle over the guaranteed LIFE of the battery. This makes the most sense and is the most accurate way to figure things. I’m a bit pressed for time, so please come back in a couple days and I’ll have some HONEST impartial battery information for all you data hungry solar enthusiasts!!
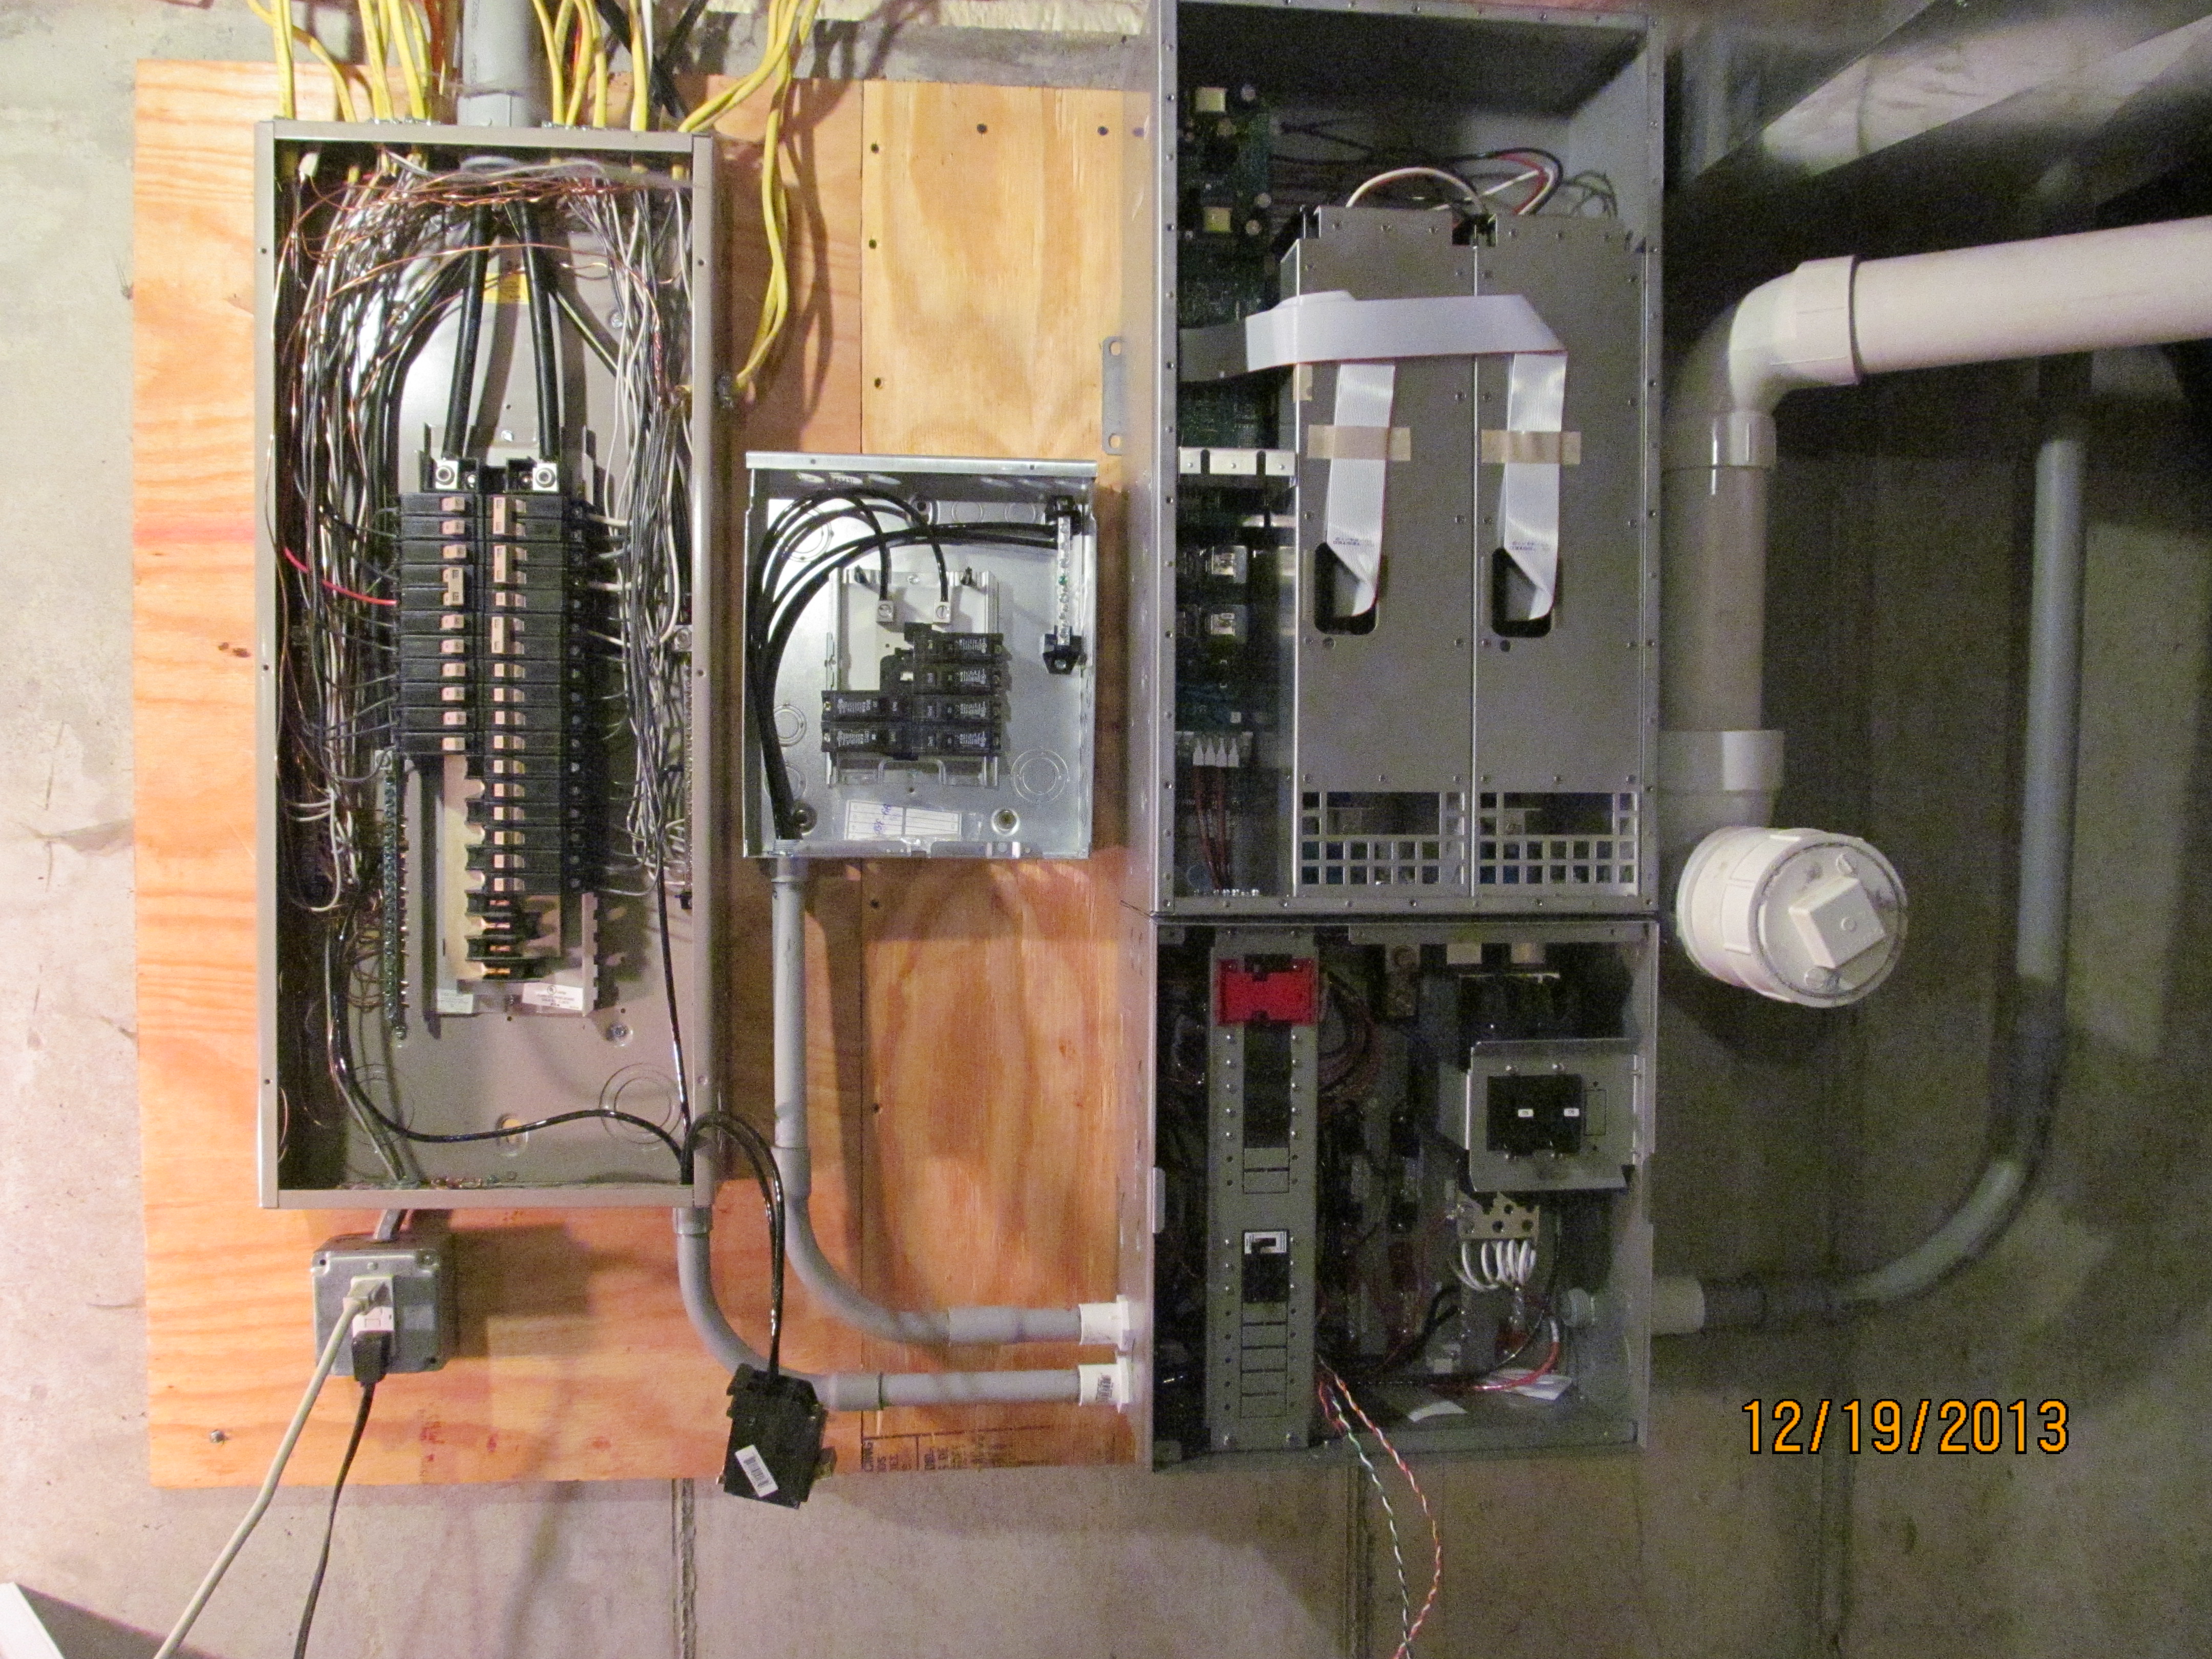
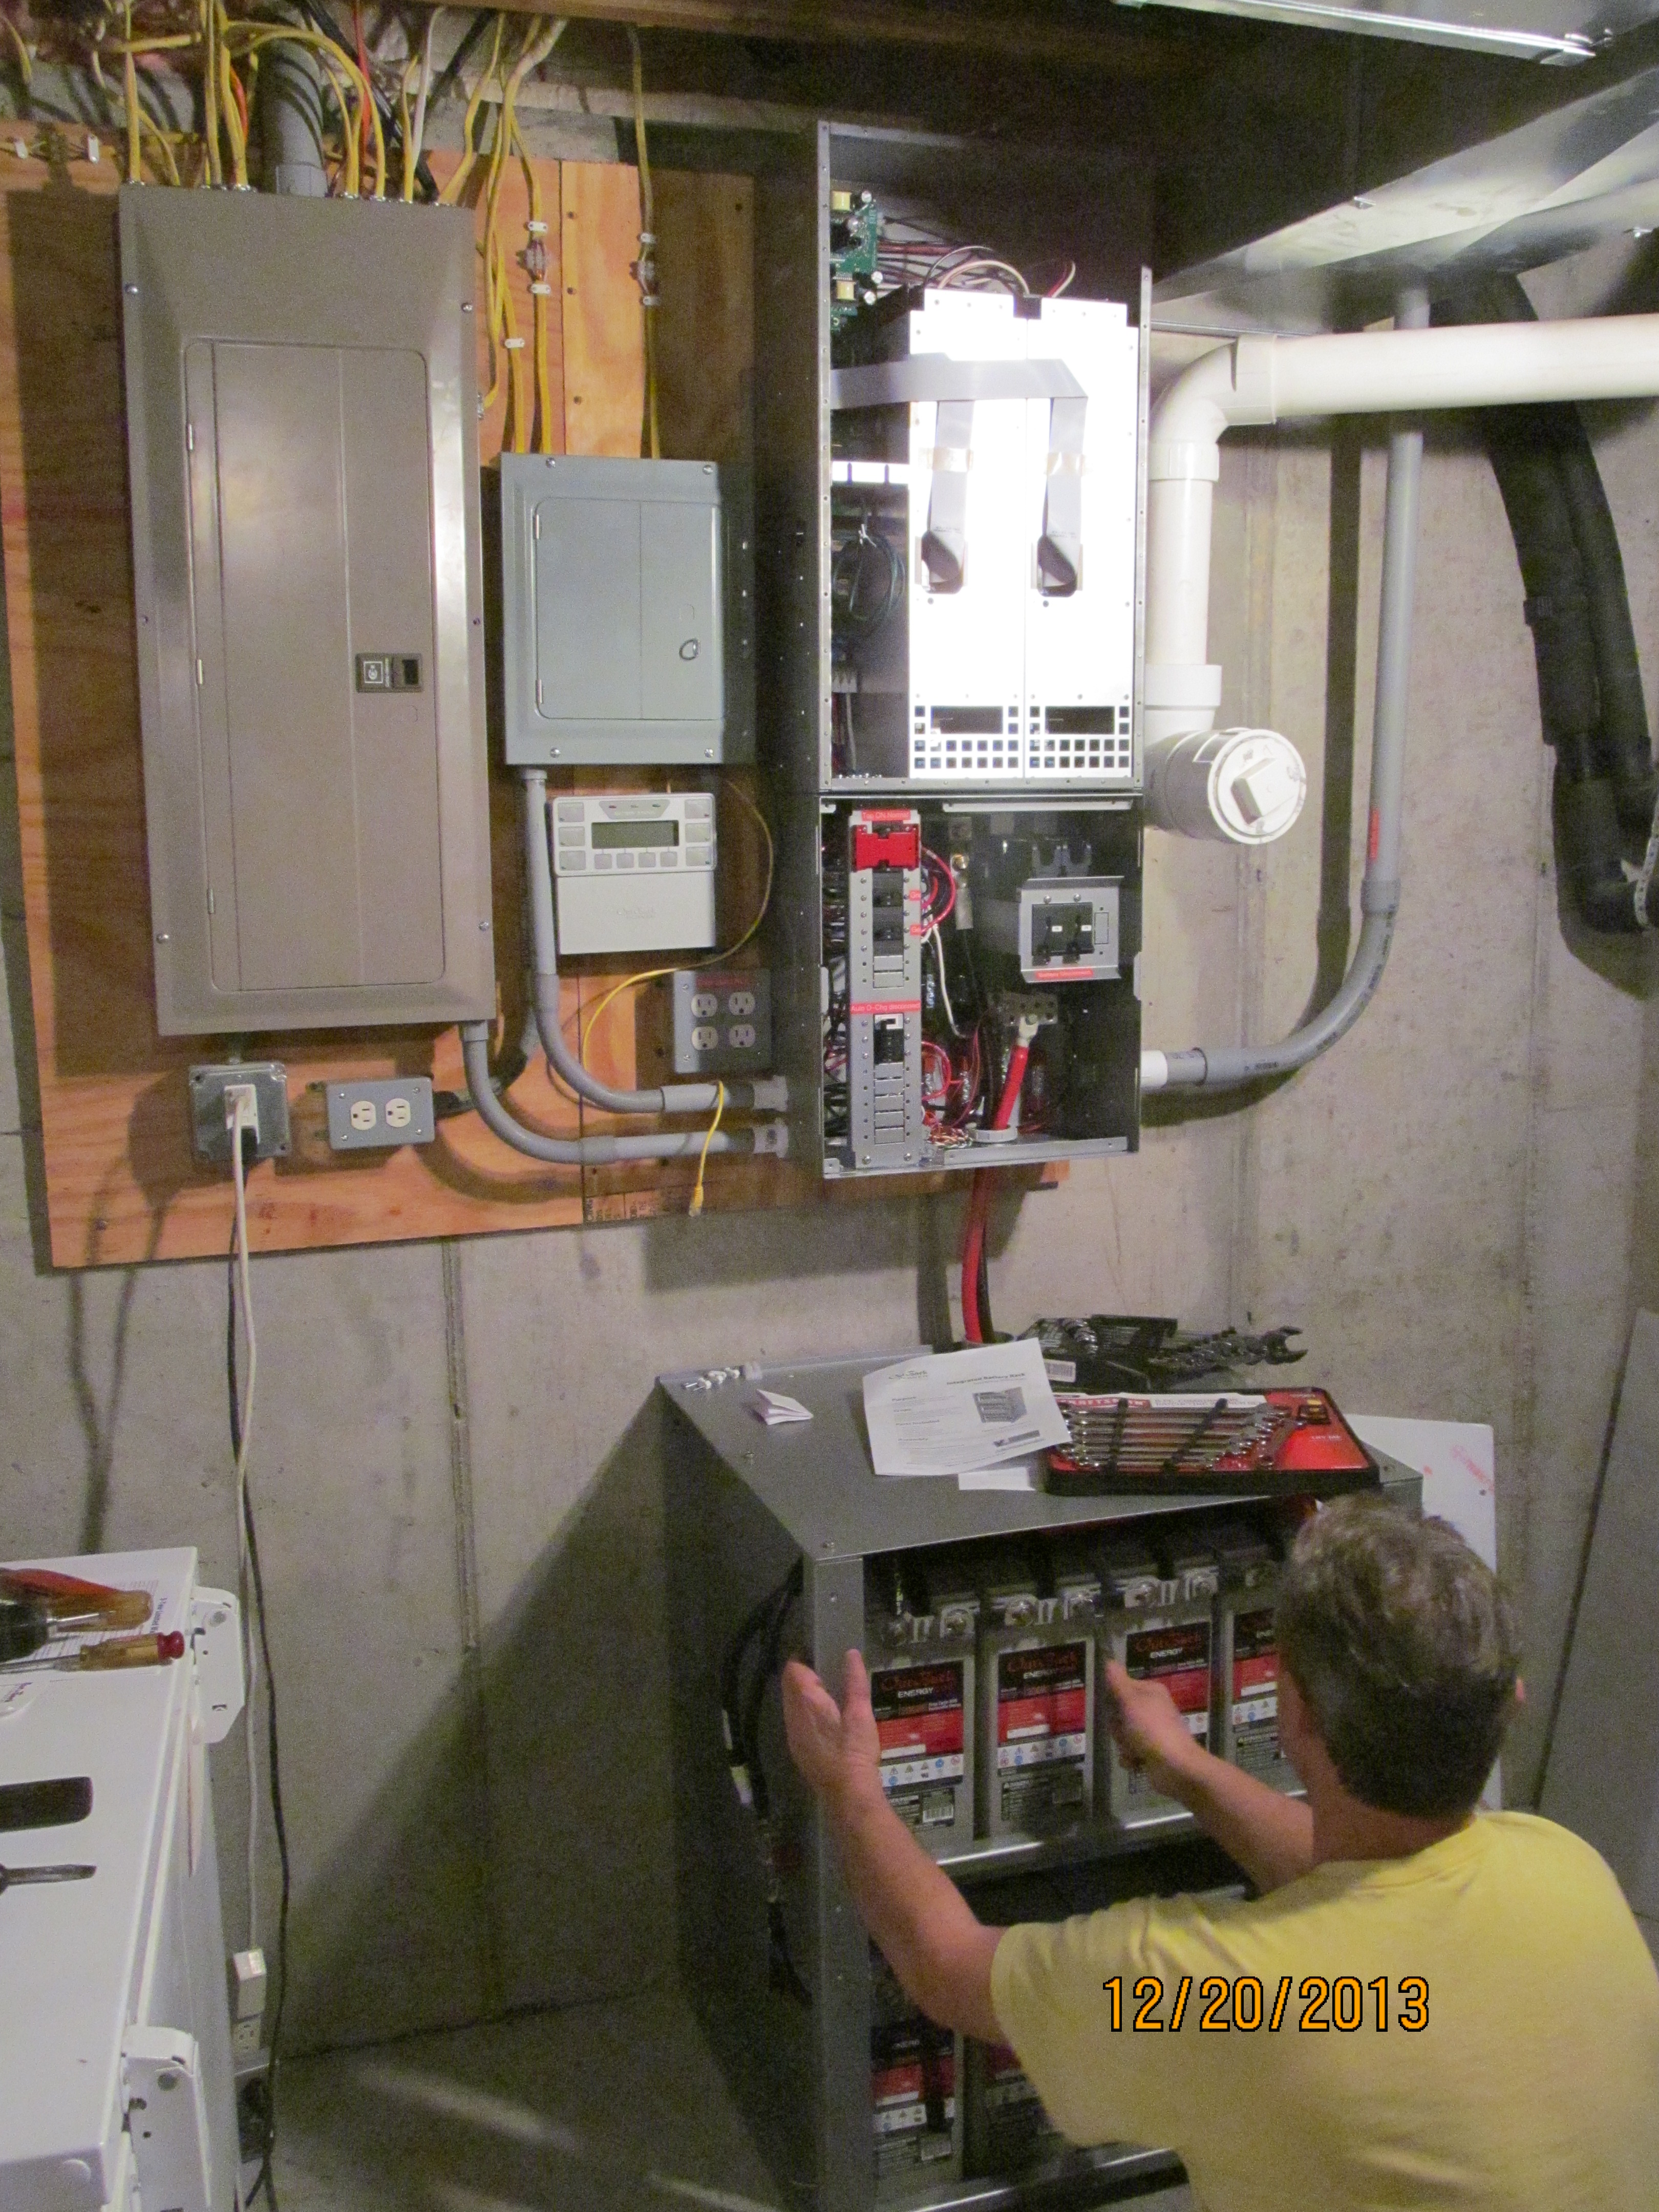
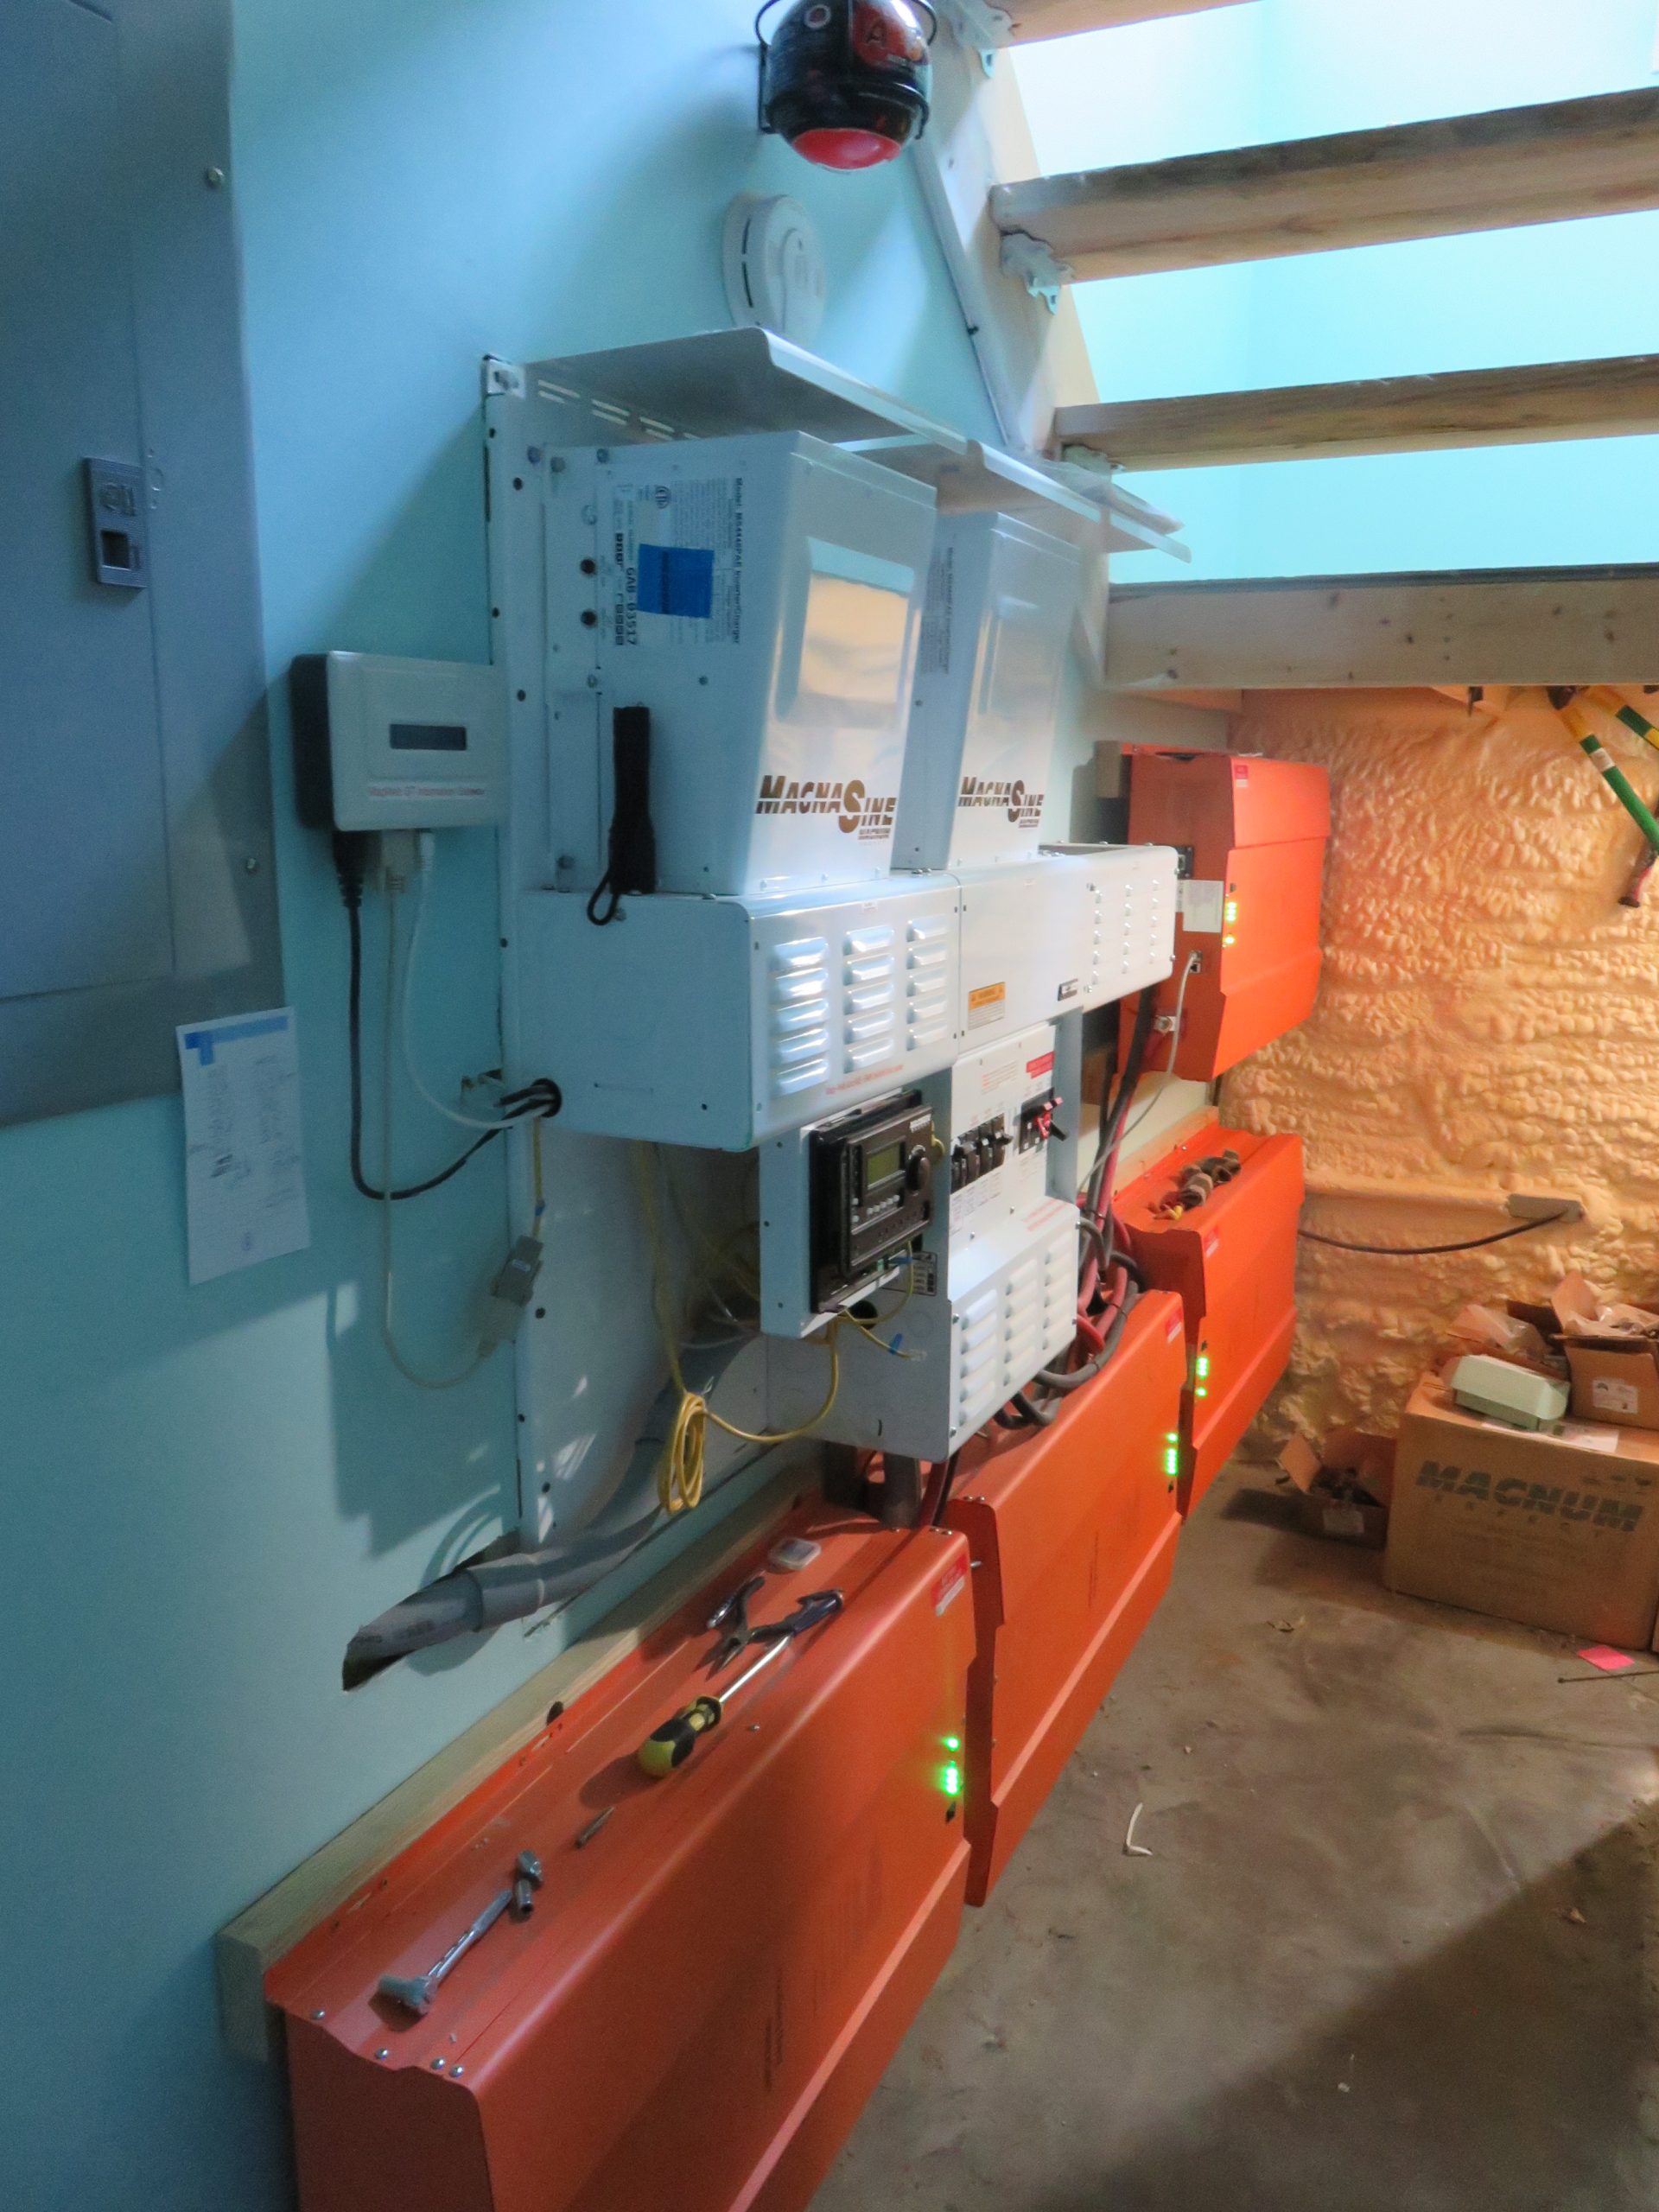 It’s been a while since I’ve posted. I’ve still been doing DIY consulting, but all my spare time has been going in to the new house. Yup, it’s OFF-GRID, even though power is available. I’ve always wanted to do this, and this was my last chance to do so. If it flops, I can always connect to the street and have a great backup system! Grey box is a “future use” primary input breaker box that goes through the wall to a meter, and down into conduit that goes under the driveway to the hillside. Wires are already installed, so if someone in the future wants street power, they can have the power company excavate from the hillside without tearing up the parking pad. From there, conduit feeds into the main switching area on the triple Magnum inverter (which only has 2 MSPAE4448 inverters mounted at the present time for 9KW of power), and then on to the MAIN breaker panel at the far left.
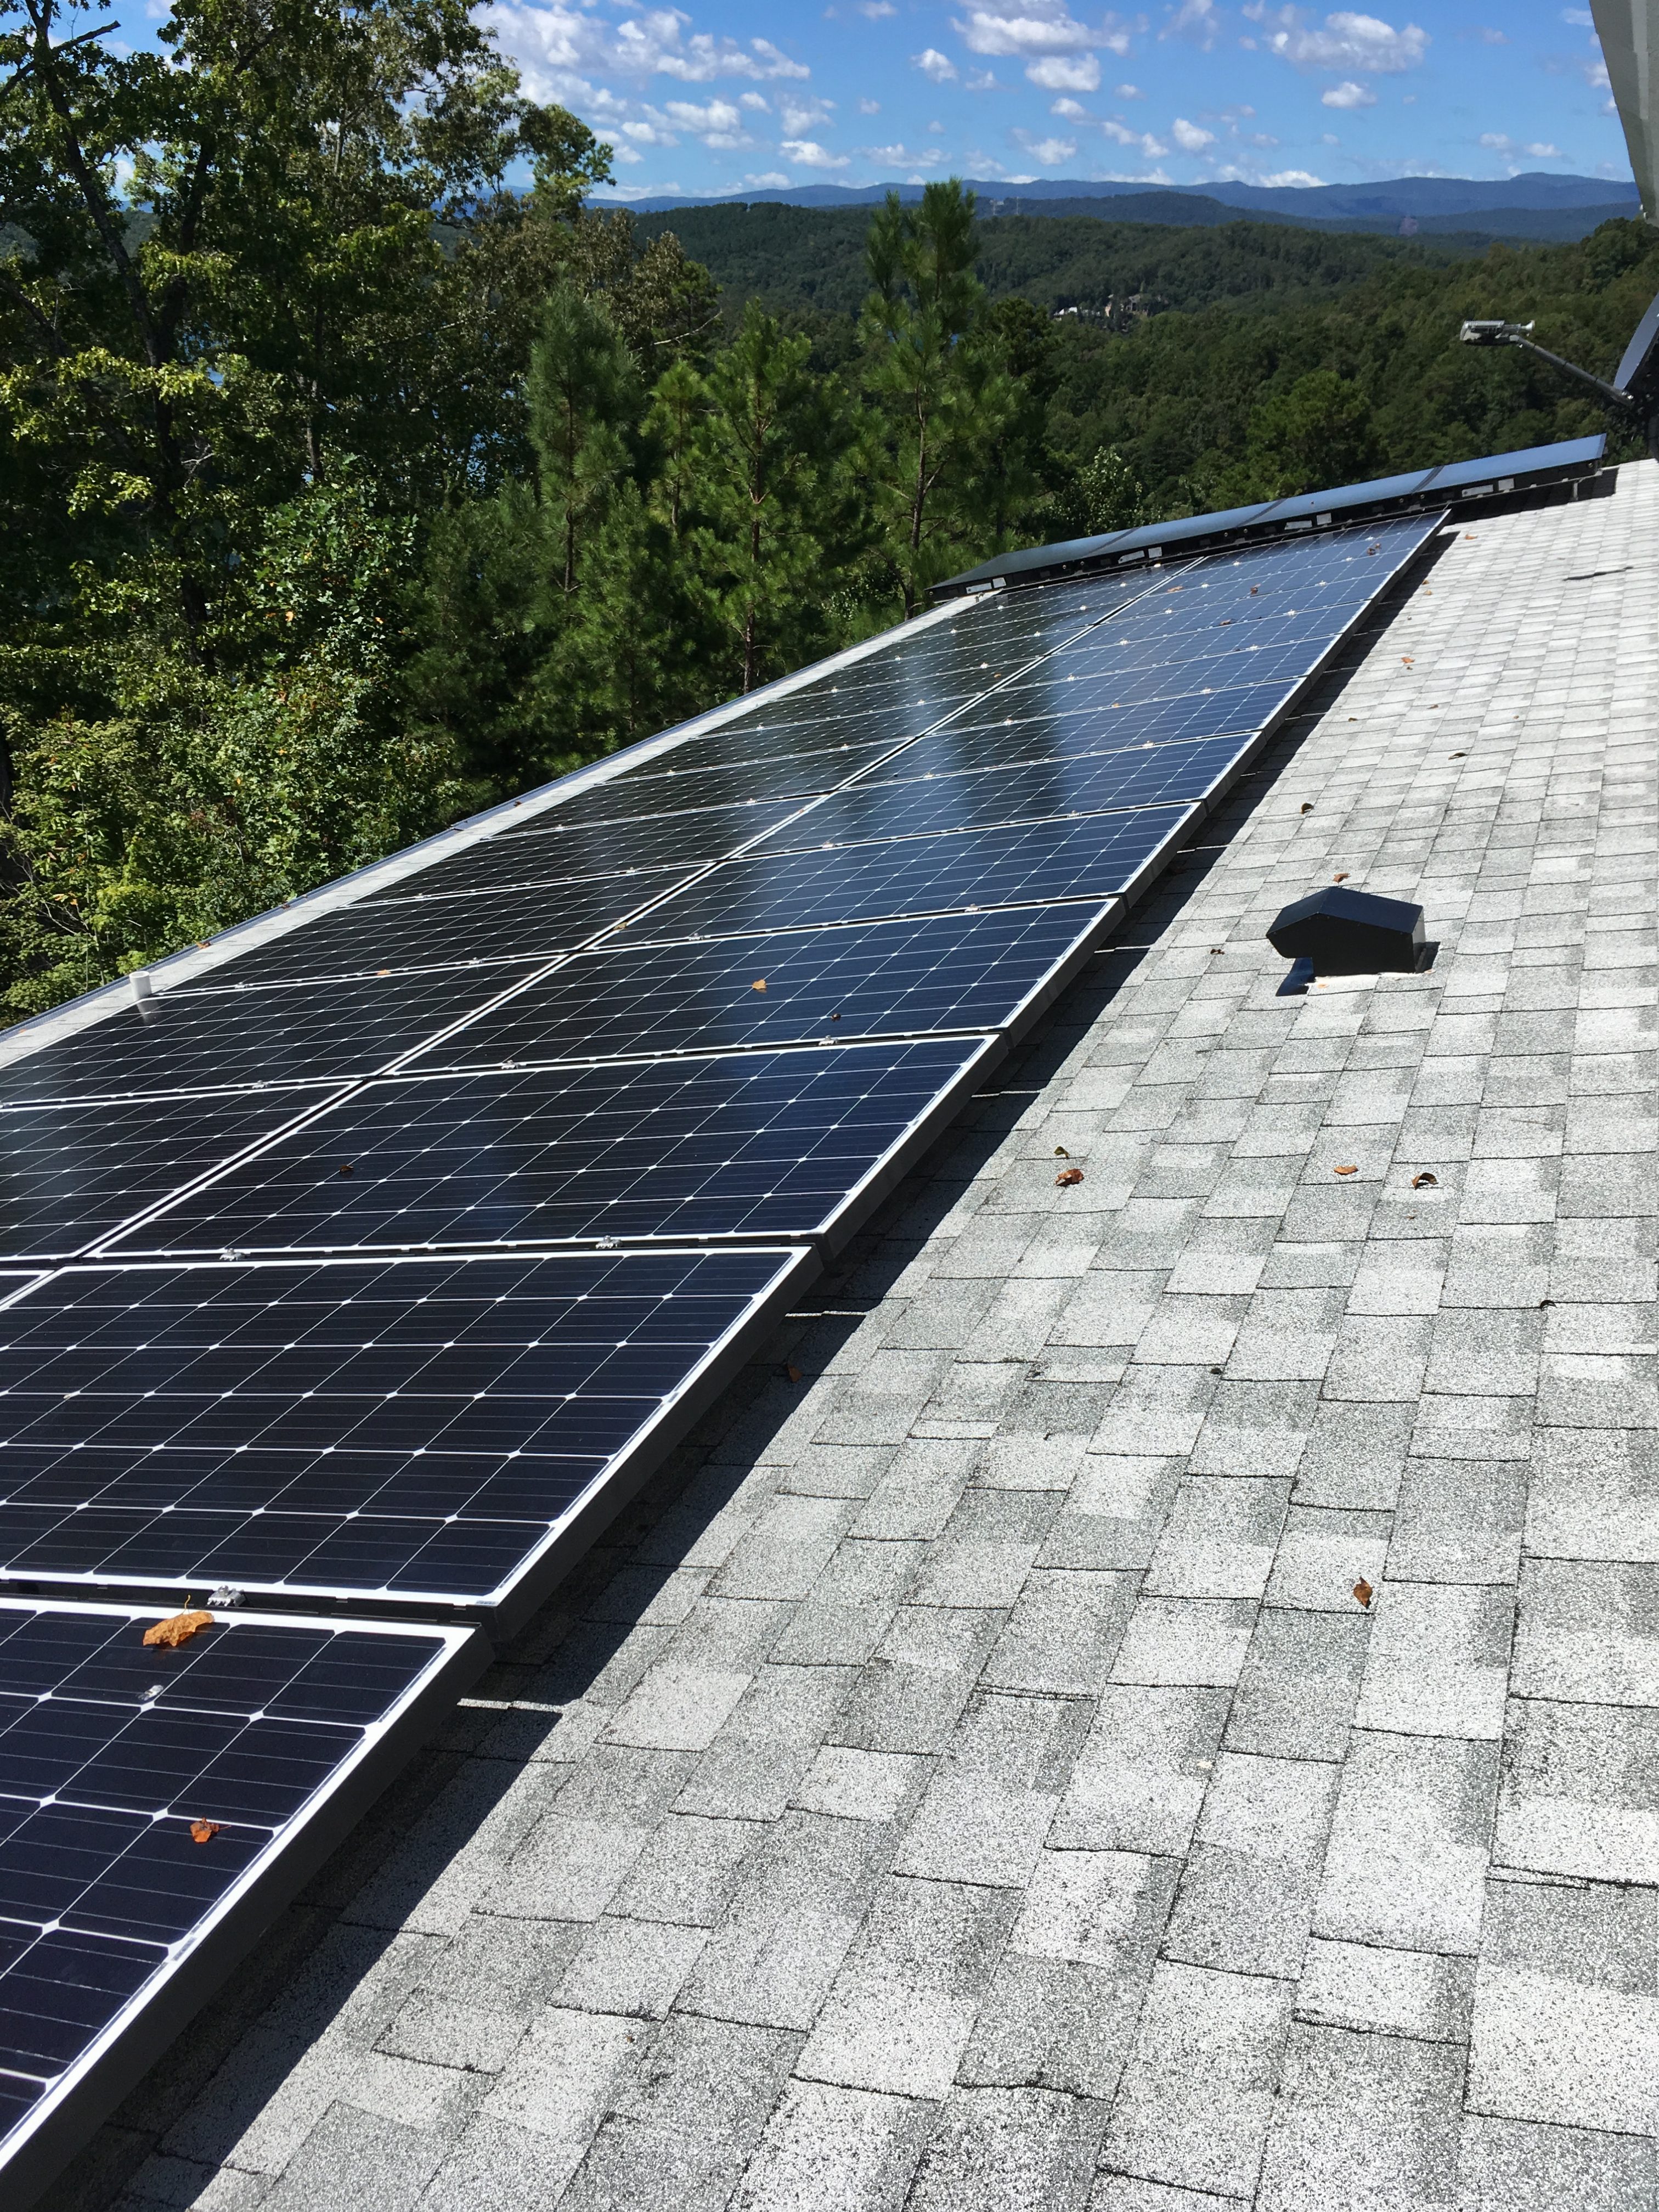
Moving to the roof, I’ve got 28 280 watt panels for 7840 watts in an ideal world. There are 14 Magnum GT500 dual micro-inverters up here that directly convert the DC voltage into 240 volts AC. There are two strings of 14 panels, and each string goes back to a 2 pole 20A breaker in the main panel. This provides both an AC back-feed into the battery inverter to charge the batteries AND at the same time provides any excess power from the sun DIRECTLY to the appliances. So on sunny days, we can do the laundry, running the washer and dryer at the same time without discharging the battery bank at all! This is dramatically different than a traditional off-grid setup with panels, charge controller, batterybank and battery inverter. The traditional setup means the power is limited by the size of the inverter. If my batteries are fully charged, I can draw 8.8KW (2 X 4.4kw) plus the 6KW from the panels for a total of almost 15KW around noon on a sunny day! I’ve trashed my big AGM batteries for the FOUR 10KW LiFePo4 batteries (orange boxes) and all connections to the Magnum interface are equal length 4/0 copper. Thus, a PERFECT matchup in terms of charging power. This also gives a daily (overnight) discharge of about 20%, which babies the battery bank and will allow for a full 6000 cycle (plus more!!) lifespan. The bank is fully charged (in normal sunlight) by 1PM each day. The panels are PERC type, and also do well on grey days, producing about 2800 watts reaching full charge before sundown even in winter. If we have too many dark days, I have a 9KW Generac that is wired to the AC input on the Magnum system. Last year it ran only once for a couple hours. No point in wasting generator fuel – just recharge batteries enough to make it through the night – sun might shine tomorrow!
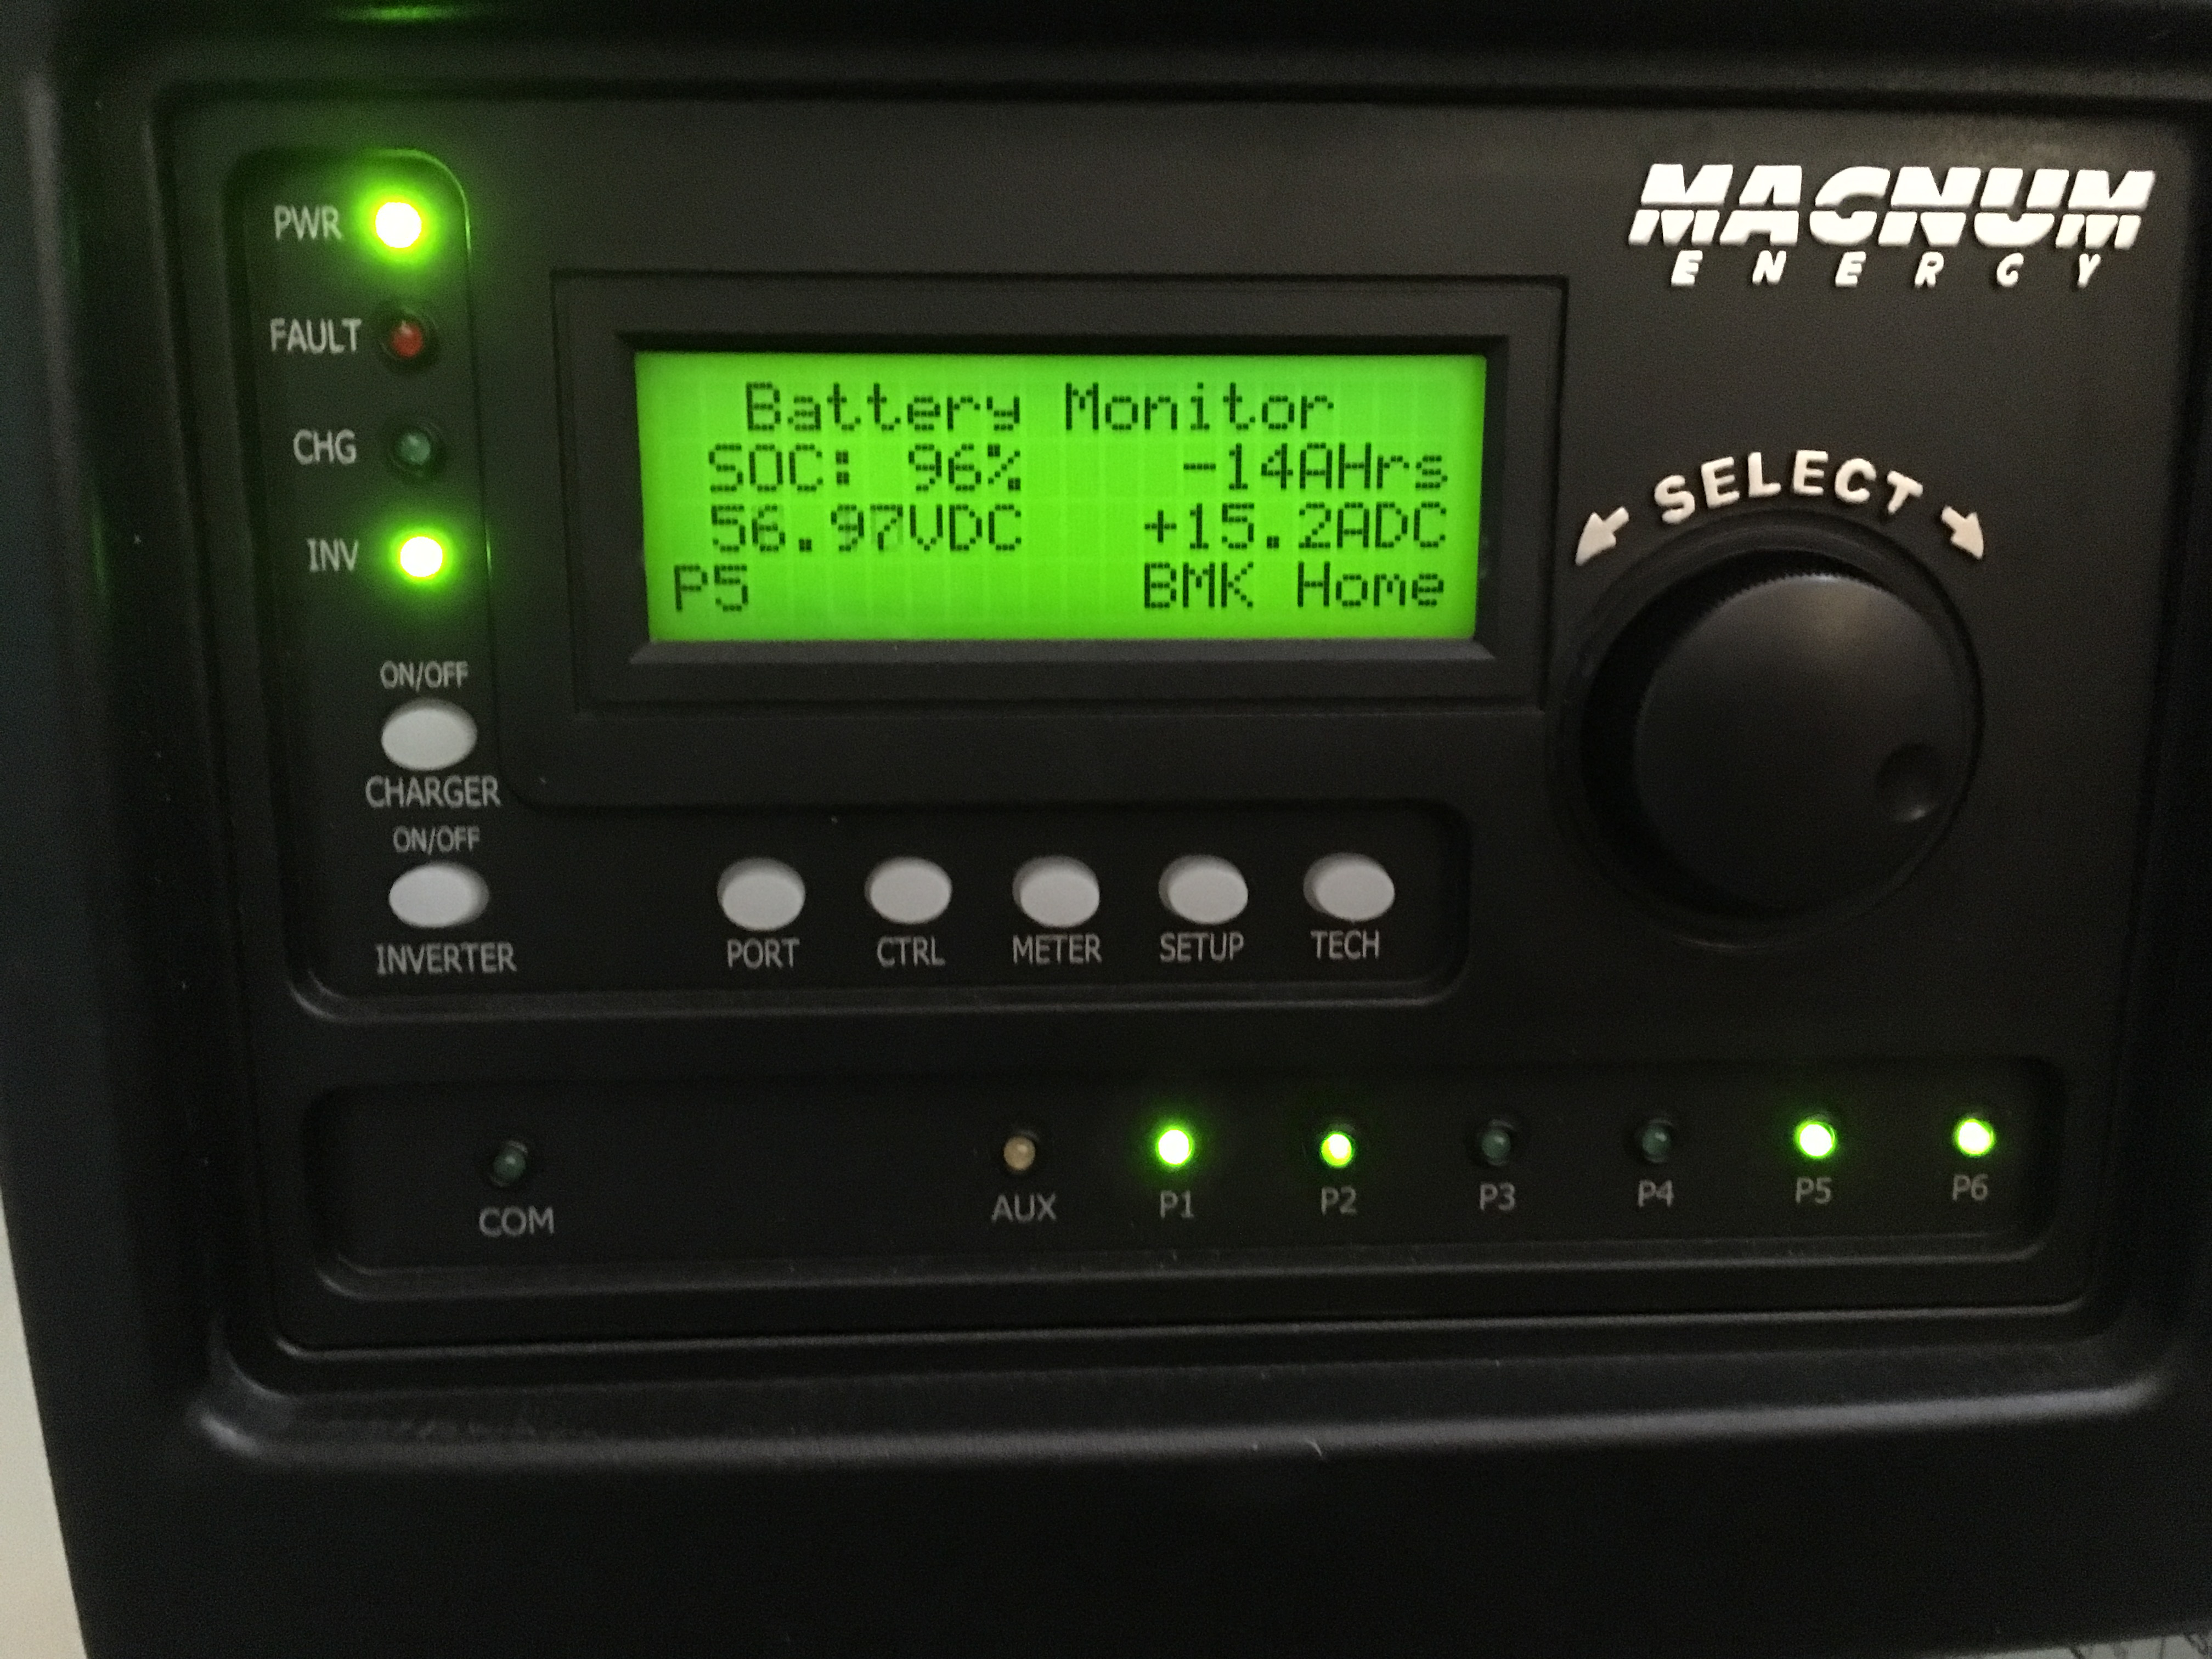 The Magnum ME-RTR Router does a nice job of controlling all three of the MSPAE-4448 battery inverters, and allows fine tuning the BULK, ABSORB and FLOAT voltages to suit whatever battery type you have. This is CRITICAL if you want to maximize the battery life by applying the proper charge regime that the manufacturer recommends. The information display is very informative. I’ve also got a regular display that mounts upstairs where it’s more convenient to keep an eye on the system. It’s also connected to the local network for viewing on my home computer. Shows the same data, but in the form of a pretty graphic! A Magnum MAGWEB is also connected to put the data onto my local network. IMPORTANT NOTE: if running AC coupled OFF GRID, the ONLY PARAMETER THAT WILL TERMINATE BATTERY CHARGE WHEN FULL IS THE “ABSORB” setting. None of the other ARTR settings matter!! it should be set to about 4 volts LESS than the fully charged battery will be!!! If you fail to follow this, you will overcharge your batteries! This will cause OVERHEATING of lead acid, or SHUT DOWN of ANY LiFePo4 battery with a BMS. If your BMS disconnects UNDER LOAD, your inverters will EXPLODE!!!! Please re-read this. It is VITALLY important!
For those of you who noticed the 4 larger panels at the far end of the roof, those are german made 4X8 solar THERMAL panels that will heat water inside a 100 gallon storage tank. This gets circulated through a maze of 1/2 inch pex tubing embedded in 1 1/2 inches of Gypsum-concrete on the main floor providing solar radiant floor heating when needed. Each of the 4 rooms on the main floor has it’s own thermostat as well as a branch in the basement where it is converted to hot air.
We’ve bought a small piece of Heaven on Lake Keowee in South Carolina and are almost finished with the process of building our retirement home there. It’s been a long process and we are now moved in and finishing a few last items like ceramic flooring and wood trim. In the meantime, I will still be taking care of my many Cincinnati clients both old and new, and nothing will change in the immediate future. Long distance work East of the Mississippi will continue on the same basis as before. With panel pricing now below 50 cents/watt for even name brand panels, and inverter prices falling as well, it’s not uncommon to come in around $1.35/watt complete for roof mounted grid-tie systems (before the 26% tax incentive!) so SOLAR is more affordable than ever before. This is now a 5 to 6 year payback! If you’re interested in a DIY Solar project, and you live East of the Mississippi, or anywhere around Lake Keowee, look me up and I’ll be glad to help you save a bundle on grid tie, grid backup, or even off-grid DIY SOLAR PROJECTS!
SolarEdge Maximizer mounted to panel and leads dressed correctly.
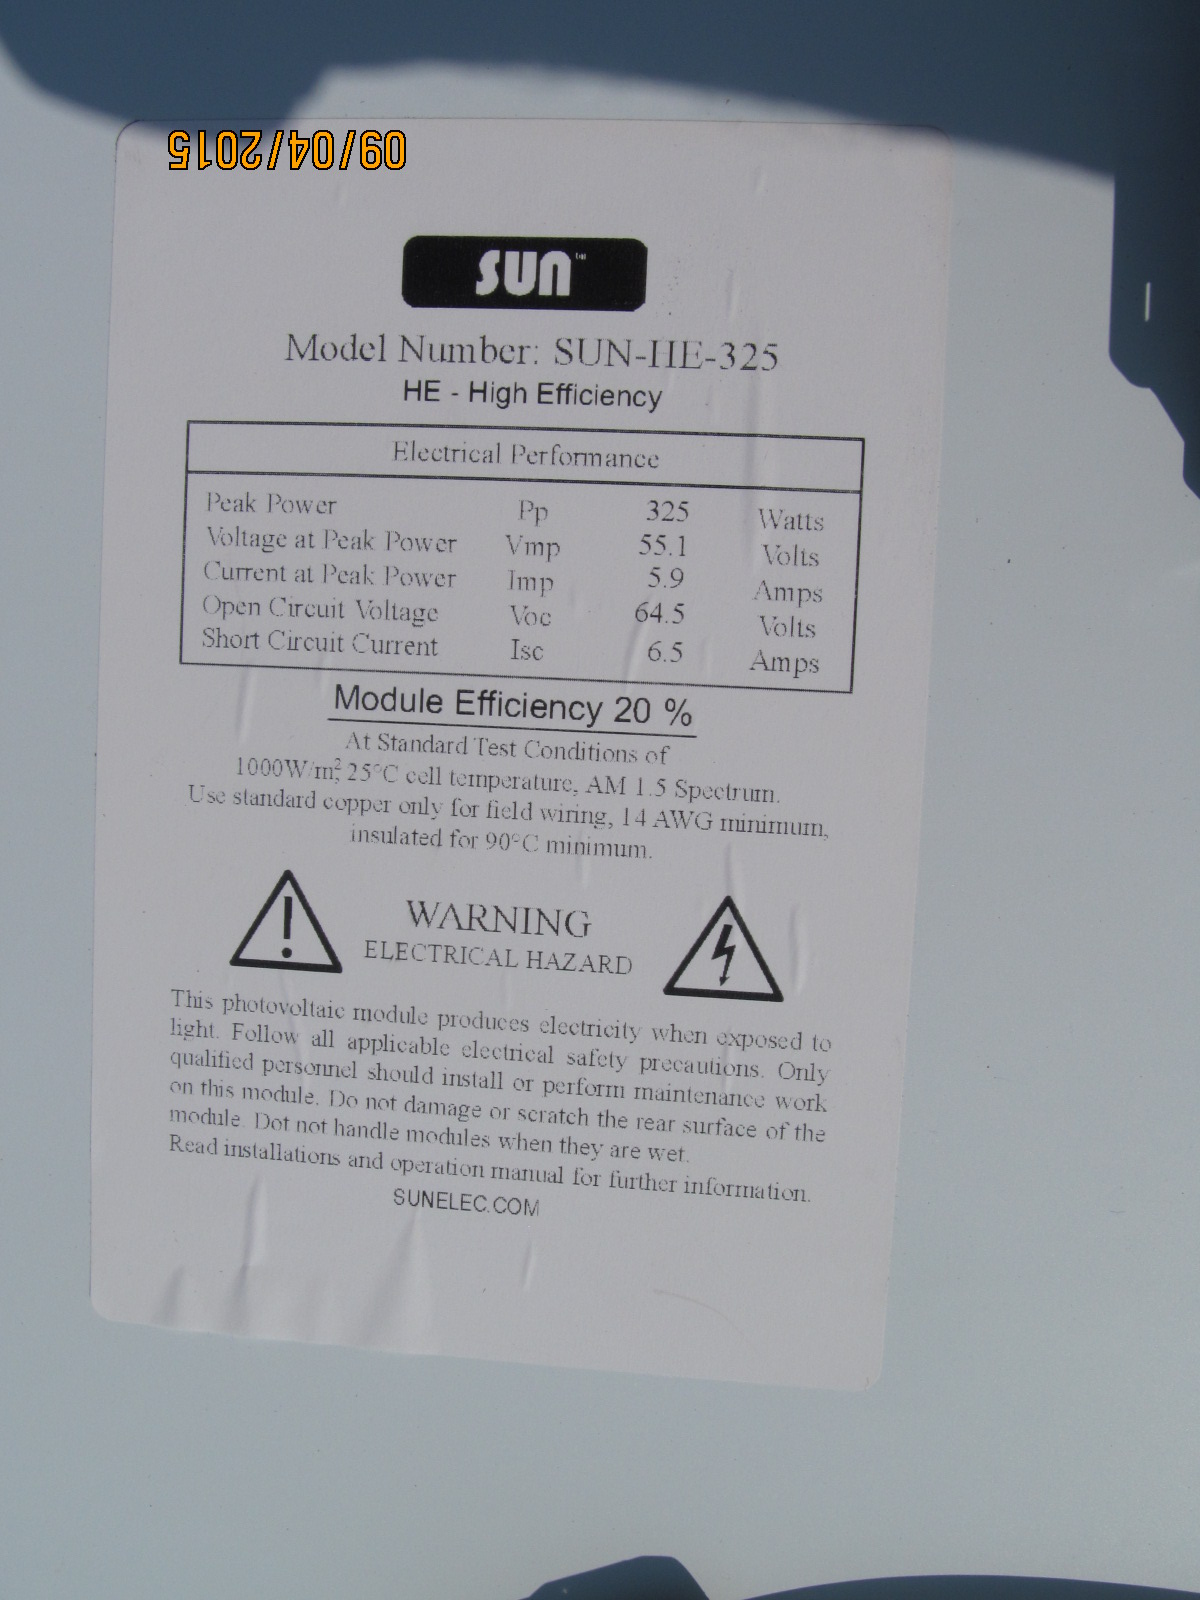
label on SunPower. Impressive specs!
SunPower panels are made by a vertically integrated company in California using proprietary cell technology their founder developed. Their cells are small, but very efficient, with NO shiny silver conductors blocking the face. These cells are found on most Military, aerospace, and high-end jobs! Imagine my surprise when my favorite panel reseller announced they had some for sale. Normally, these panels go for about $1.50/watt, and can only be purchased directly from SunPower. The panels we got were obviously “2nds”, but the reason why was because their leads were shorter than standard! This project used a SolarEdge inverter, that has MAXIMIZERS mounted at each panel, so the slightly shorter lengths had ZERO consequence on this project, and the homeowner got a tremendous system at a DEEP discount. The reseller put his own label on the panels (which promptly fell off at the first dew!), but from the photo you can see the specs, and they are impressive. What’s even more impressive is that the panel SIZE is 41 X 60 inches – SMALLER than standard 60 cell panels on the market!.

two SolarEdge 7600 inverters mounted to panel in the basement
The job came to a total installed power of 14,300 watts, so I recommended that we use a PAIR of SE 7600 inverters. PUCO rules for Ohio say anything over 6000 watts must have a utility grade meter, but for this job we needed TWO meters. The client had TWO 200A service panels, and in order to be in compliance with the NEC (National Electric Code), we could not backfeed both inverters into one panel due to the current limitation for backfeeding. (1.2 X buss rating minus the main breaker) so it would be (1.2 X200)-200 =40A. So we ran each inverter through a meter, to a disconnect switch mounted on the outside of the house (required by the local Fire Department) and then to each inverter. It was a little extra work, but it passed all inspections with flying colors. Both inverters were mounted side by side in the basement, and the 4 strings were run down 2 rigid metal conduits from the roof all the way to the inverters. When running high voltage DC lines inside a residence they MUST be in RMC. That way, if there is ever a short, it will go to the metal conduit and cause a breaker to pop rather than get hot and start a fire! Here’s a picture of the inverter pairs and the happy homeowner!

Finished installation of 44 panels on south facing roof.
Standard Everest rails and hardware were used to mount the panels to the roof. 8 of the panels were darker than the others, so we put them centered in the bottom row, between some plumbing vent stacks. There’s not a tree anywhere near the home and the roof faces due south, so it makes a LOT of power!! The owner provided a crew of 4 and the whole job took just a hair more than 2 days of time. They prehung and wired the inverters in the basement, so all that was required was the panel hardware and mounting, and running the HV solar wire down the RMC to the inverters in the basement! This setup makes about 1,500 KWH per month (average) which in our area adds up to about $150 in power savings!
I apologize to my dedicated readers/followers/solar enthusiasts… I got so bogged down with solar projects I just couldn’t find the time to update the blog!! Well, I find myself with a little free time this week, so I’m going to do my best to get caught up with some of the projects from the last year and half!! Stop back often for updates!!
I just received this announcement in an email from one of my many electronics industry sources. It describes a new filter, used by the military to protect sensitive electronic gear from EMP or equivalent events. Just thought I’d pass it on! HEMP Filter link
It’s been a while since I posted any new activities – but only because I’ve been so darned busy! A client in Harrison Indiana wanted a a solar system installed, but he launched his project too late in the year, so rather than fight the weather, we decided to just install the BACKUP portion of the project ahead of time – giving him the benefit of a backup system for the upcoming Winter season. He lives out in the country, and encounters frequent power outages during the winter months, so this was a good compromise, and that’s what this blog entry will be about.
We decided to go with the new OutBack RADIAN 8Kw inverter and the Outback AGM batteries, since they don’t require watering or venting. He had space on the wall where his current Main breaker panel was located, so we just expanded with some extra plywood. We hung the inverter and mounted the battery bank directly below it so that we would minimize the distance the 4/0 Battery cable would need to cover.
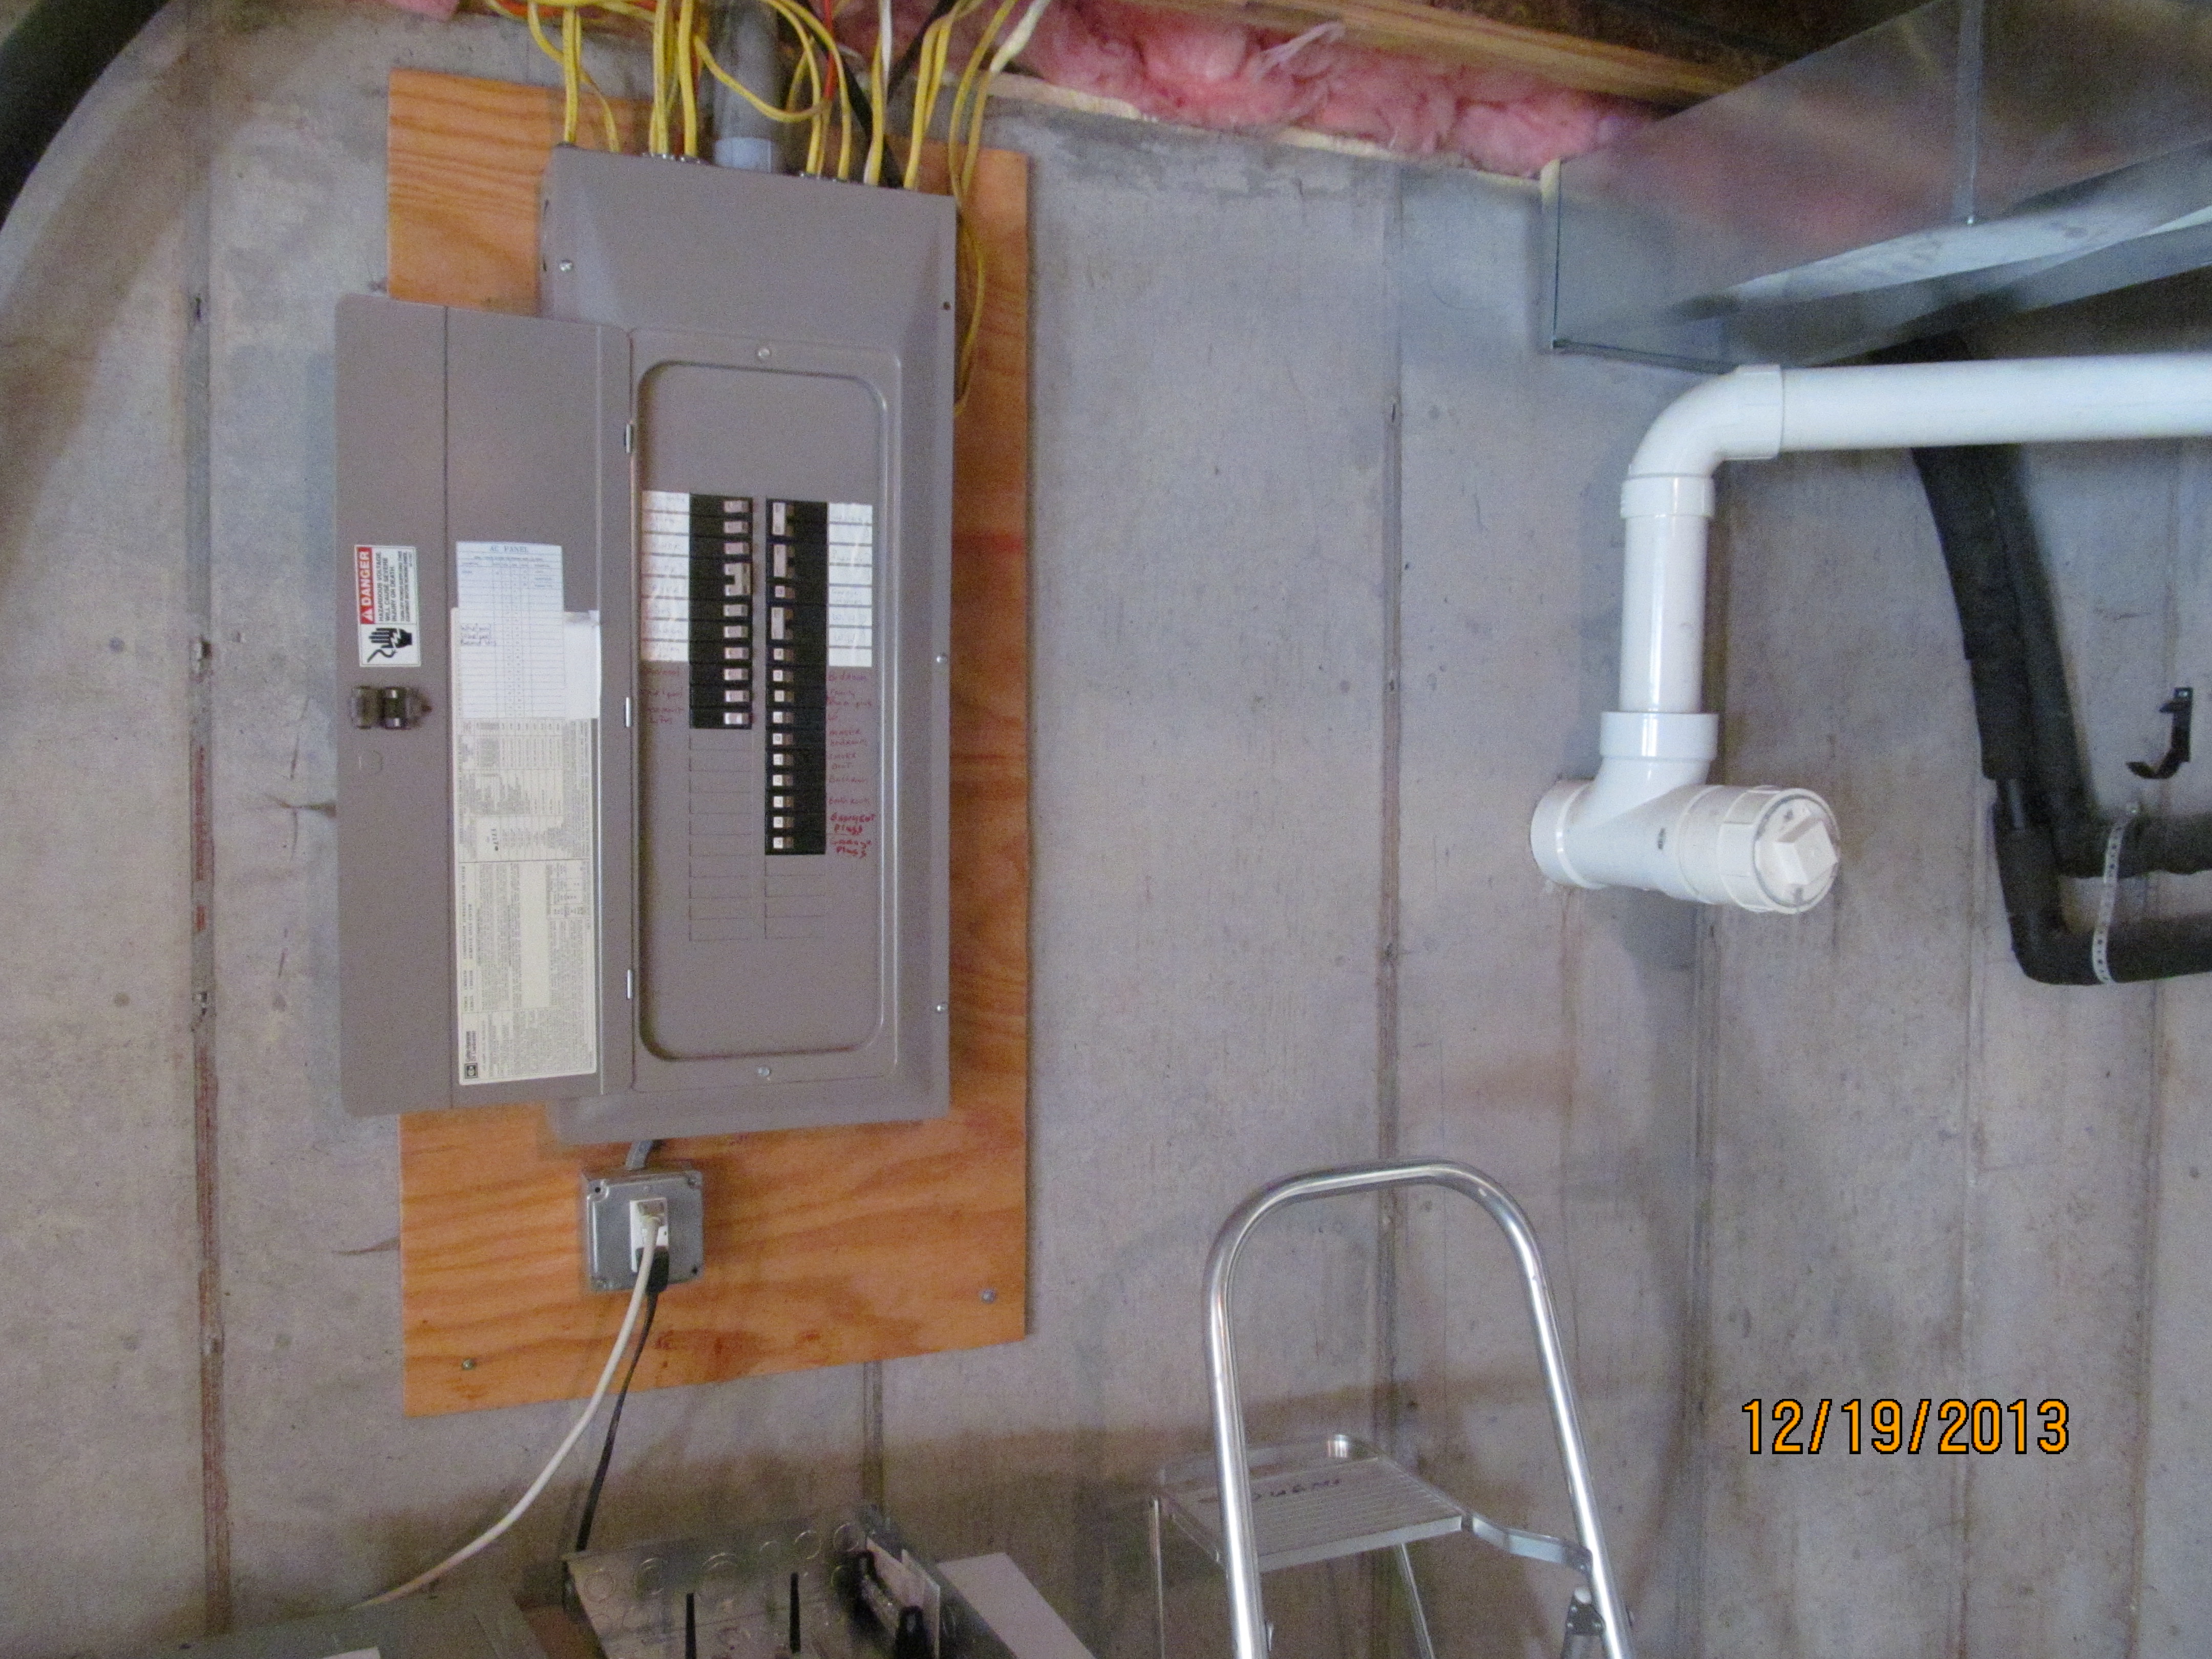
Main panel location at start of project. Room to the right and below.
With that plan in mind, I went in search of some 1 inch plywood, which it seems none of the lumberyards carry. I got the lumberyard to precut a 4 X 8 sheet of 1/2 inch thickness, and managed to squeeze them into our PT cruiser. A couple squirts of glue and some 3/4 drywall screws to hold them together got us the mounting plate we needed for all the things we were going to add: a SUPPORTED LOAD panel – this is the loads that will be backed up when the power drops, another outlet for the freezer next to this panel, and the OutBack MATE3 control center that lets us program the Radian and observe the voltage and operation visually.
The MATE3 also provides the interface to the internet so that this can all be monitored from a PC on the web. We planned on adding solar this year when the weather warmed up, and the Radian PREWIRED INTERFACE took all the hassle out of making this all work. THe interface is directly below the Radian in the next photo. Everything inside this prewired box is clearly labeled and it would be VERY hard to get it hooked up wrong!
New plywood backer, Radian (top) and prewire box (bottom)
The next step was to move the breakers and wiring for the supported loads from the main panel (at the left) to the supported load panel (in the middle). The lines were too short by a couple of feet, so I went to the electrical supply house and found some neat nylon splice blocks that have compression screws and they come in big strips of 20 or 30, so I could cut them into blocks of 3. This allowed me to splice new romex (same gauge) to the black, white and copper ground wires in a manner that was safe and in compliance with the National Electrical Code.
The wood backing also allowed me to screw the splice blocks in place at the top of the board (out of reach) to keep things safe. Please notice that all connections between the breakerboxes, the inverter and anything else on this board are all in conduit. The only exception is the Romex, which by code is allowed. Just remember that EVERY line of romex going into the supported load panel MUST have a strain relief. You just can’t run wires through the holes in the box – it would NEVER pass an inspection!
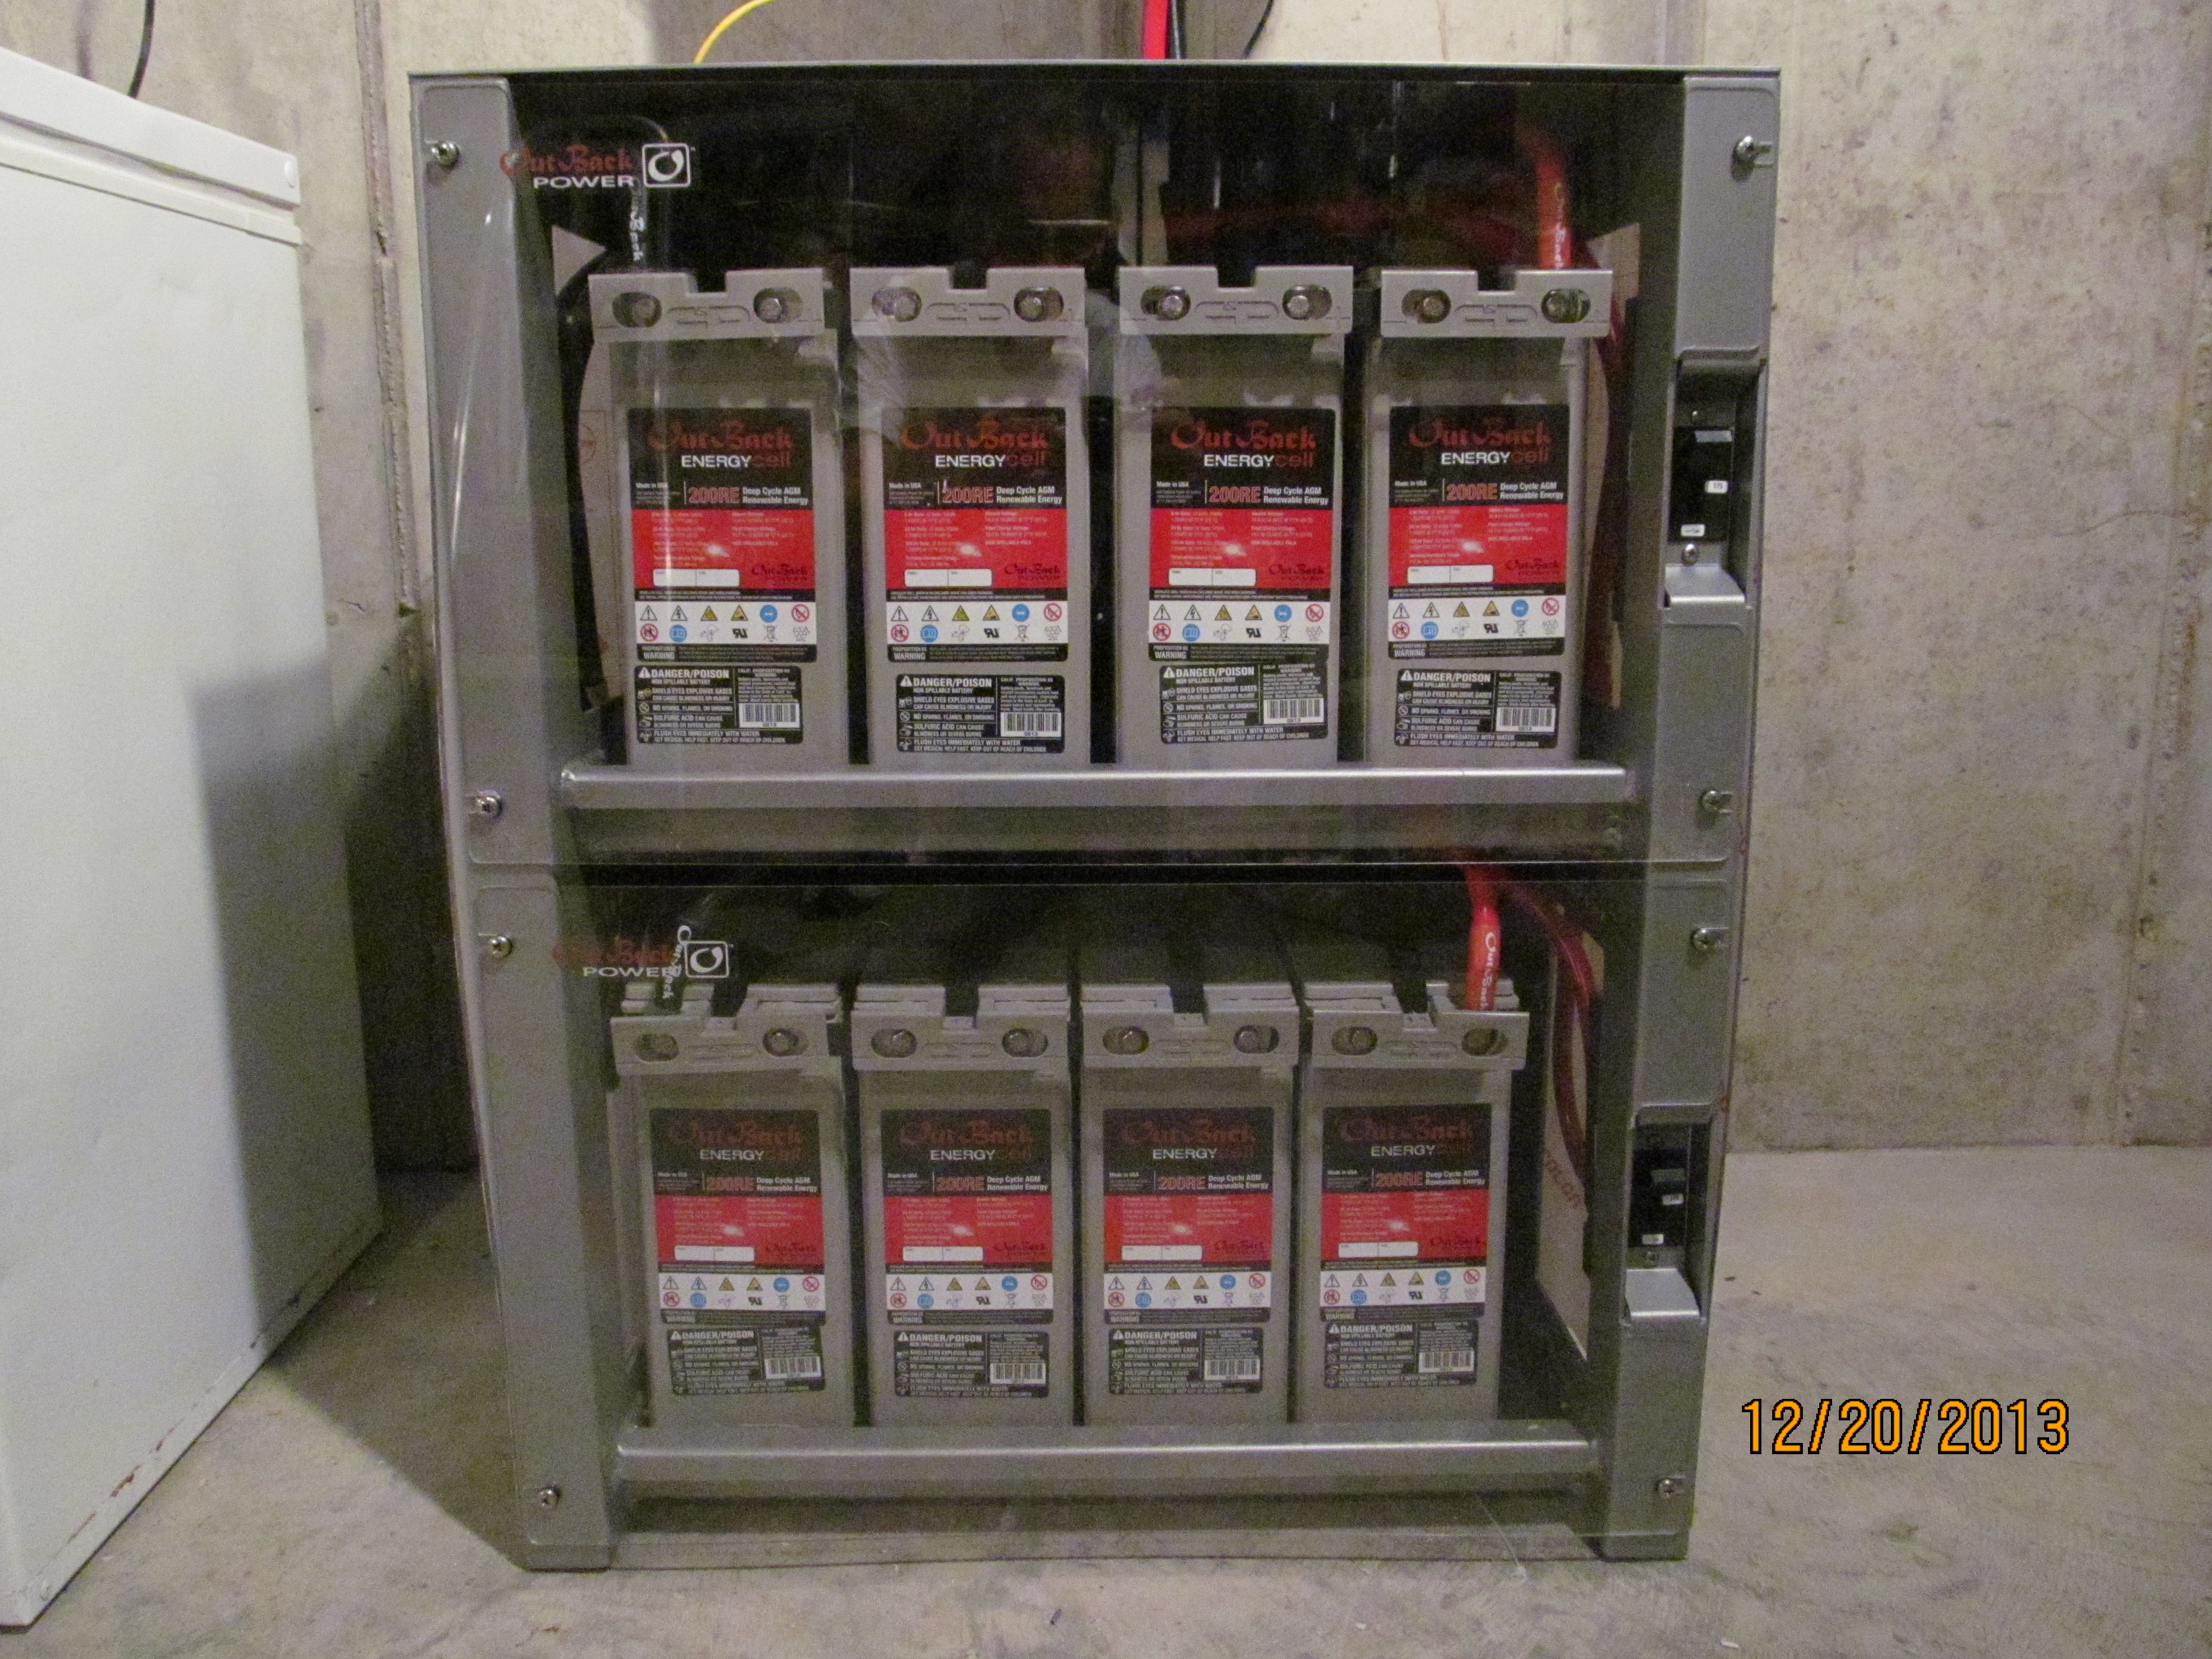
Outback AGM battery bank. Great for no-worry storage!
While I was doing all that wiring, the homeowner was busily assembling the battery cabinet and installing the OutBack AGM (sealed lead acid gel type) batteries and all the jumpers to create the battery bank. There are two banks of four batteries, which are then paralleled to achieve a sizeable AmpHour capacity.
These batteries are not cheap, but they don’t require any attention like checking fluid level, or requiring a vent fan, so it simplifies the installation and use of the system. By the way, if you want a closer look, just click on the photos and you will get a full screen size view.
If you look close you’ll find that there is a 175Adc breaker for each ROW of batteries in the cabinet. This will come in handy troubleshooting in the future. It also keeps things safe while connecting the battery cables. The cable used in this setup is high strand count 4/0 with FACTORY TERMINATED ring ends. No, you CAN’T use welding cable, and don’t even THINK about putting ends on by yourself.
Always purchase SOLAR battery cables that are pre-terminated by your supplier. During normal operation DC current out of the battery can reach peaks upwards of 500 to 1000 AMPS. Any weak or loose connection will get hot and create a problem in no time!
Almost ready to turn on. No feed from the solar just yet.
Here’s the finished installation – just a few more lines to move from the main breaker panel over to the supported load panel. If you click on the photo, and zoom in, you can just make out those splice blocks I was talking about at the top. There was just enough room below the supported load panel to mount the Mate3, and the finished installation looks pretty nice with all the brushed steel panels and covers re-installed.
Other than the battery cabinet, the backup system didn’t take any additional floor space, so it was not a problem where we placed everything. The homeowner still needs to run an ethernet cable down a chimney chase from upstairs to put the system online – another project for a rainy day. I went back in the early Spring of this year to install the ground mount and a sunny boy inverter at the back of the property.
This is an old farm, and the service is sort of snaked around the property. By intercepting the feed to the barns, we will be able to redirect them THROUGH the RADIAN INVERTER PREWIRE BOX, and effectively create an awesome GRID BACKUP system that will operate AND Charge the batteries when the utility power is down. In Bright sun, we have 8KW from the inverter/battery bank COMBINED with 5 to 6KW of realtime solar power to run some BIG loads like AC or the washer/dryer.
If you look back at the 2nd picture, you can see TWO large boxes with cables coming from them. These are two 4Kw inverters. The RADIAN design is redundant- if one quits, you still have power, just 1/2 power. That’s better than NONE when the power is down. I think this is the best feature of the radiant design!
Wow, thanks to all who attended my seminar this year! I changed it up a little and made it a presentation of good-to-know FACTS about solar – every aspect of it. Ended up with about 10 minutes of open questions, and I got lucky again – I was able to answer every one with a solid response! Sorry I left my NEW box of business cards at home, but I think the 12 folks who came up to get the 12 I had were the folks most interested in future contact (I hope!). I promised I’d post the PowerPoint presentation, so here it is with the presenters notes included. MEN FAIR 2014 Presentation Nothing that will rock the world, but there might be just that one photo, or factoid that you’ve been looking for! Thanks again for all who were in the PACKED tent (even if you just wanted to get out of the rain!)
Here are some highlights from a recent article in SOLAR INDUSTRY MAGAZINE.
If several recently introduced legislative bills give any indication, Congress has heard the call from solar energy advocates to modify the investment tax credit (ITC).
The ITC, which was originally set to expire Dec. 31, 2021, currently pays a credit of 26% for qualifying projects. The tax credit has been extended to 2030!! The credit also covers batteries!
In recent months, both the House and Senate have introduced legislation that not only called for an ITC extension but also stipulates that solar projects should qualify for the tax incentive based on when they start, as opposed to when they are placed into service.
On Feb. 6, Sens. Dean Heller, R-Nev., and Michael Bennett, D-Colo., co-sponsored the Renewable Energy Parity Act of 2014, which would allow developers to qualify for the ITC if projects are under construction before the credit’s expiration date, rather than having to wait until those projects are completed and in service.
In August, Rep. Paul Clark, R-Calif., introduced H.R. 3017, the Renewable Energy Construction and Investment Parity Act of 2013, which also extends the energy tax credit to solar energy, fuel cell, microturbine, combined heat and power systems, small wind energy, and thermal energy properties – the construction of which begins before Jan. 1, 2017.