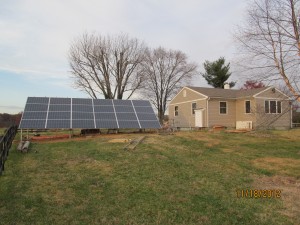
Ground mounts are an attractive alternative if you don’t have much roof space and want a system that allows you to live comfortably WITHOUT the grid!!
Nestled in the middle of a 26 acre plot is this cozy updated farmhouse with almost 6KW of solar power. The home is well insulated, and fitted with all the high efficiency goodies. Propane fired DEMAND water heater, wood stove for heating, LED lighting and more! At first I assumed he wanted a ground mount to keep it away from the house, but when I arrived on site I knew right away the real reason – no room on the roof! But seriously, this setup goes way beyond just a large array. The owner wanted plenty of AUTONOMY – that’s lots of days of off grid operation without worry of running the battery bank down. And plenty of power, so that if he wants to do laundry while off grid, it won’t be a problem. So we got together and discussed the options and the owner decided to DO IT RIGHT the first time. I explained that batteries would be a large part of the project cost, and he would have to understand and CARE for the battery bank if he expected it to last 10 years or more. He was more than willing to listen, read, study and understand the care and feeding of his battery bank, and as a result is VERY pleased with his installation.

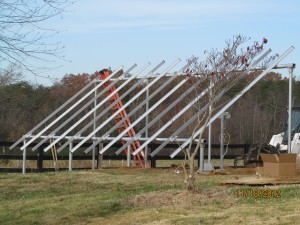
Trench backfilled, horizontal pipe (3 inch galvenized) added front and back, and vertical rails to carry the solar panels installed. Ready for panels and wiring. Owner and a few helpers accomplished this in 2 days of hard work. Not much daylight in December, but DIY folks are not afraid to work sunup to sundown!!
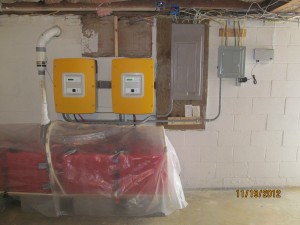
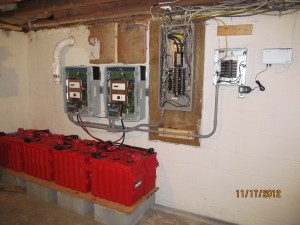
While all this activity was going on outside, I was busy in the basement, hanging the TWO Sunny Island inverters on the wall, mounting the small EMERGENCY POWER breaker box and running conduit between the inverters, the main breaker box and the new Emergency power box. I’d come up for air once in a while to check on the ground mount work, just to make sure it was square and plumb, but these guys knew what they were doing and got it all right on the very first pass! Looking at the pics below, we chose to use TWO Sunny Islands for several reasons. 1st and most important was that the Sunny Island is without question the best BATTERY TENDER around. It can use the grid or the array charge the batteries, and it has sophisticated software to monitor the battery health and adjust things as needed to optimize the battery care. It LEARNS over the 1st 8 weeks how the battery supplies power and how it accepts charge and then adjusts itself for the best possible care. We used TWO Sunny Island inverters so that we could SLAVE them together and create 240VAC “split” phase. The Sunny Island is a 120VAC unit and would otherwise need a lossy transformer to boost the output to 240VAC. We doubled the available continuous output power to 13,000 WATTS by doing this. That is a LOT of backup power, and will allow completely normal living in an off grid situation. The owner wanted lots of autonomy (days of power off grid) so we went with the largest batteries withing the budget – Rolls FLA 6 volt 820AH. EIGHT of them to reach the 48VDC the Sunny Islands need. That’s almost 40KWH of backup power. And remember, when off grid, the sun on the array will recharge them, as well as power the house! I didn’t have time to hang around while a battery BOX was built, so we put up a poly tent and connected the vent fan. This was only a temporary fix and has since been replaced by an appropriate battery box. The exhaust fan is programmed to come on while the batteries are charging – since this is when they give off Hydrogen gasses which are explosive in small amounts. The owner has since also installed RECOMBINATION CAPS which reduce the outgassing by 99% and reduce fluid losses considerably – making it only necessary to check acid levels in the battery every two months or so, rather than every 2 weeks. A wise investment – since it minimizes outgassing of Hydrogen if the vent fan were to ever fail! Batteries are a VERY serious bit of hardware and you MUST care for them if you expect to get 10+ years of service! Always wear safety glasses, a rubber apron and rubber gloves when checking/filling the cells!

Some of the AC lines have been moved to the emergency breaker box, all covers are on, and temporary poly cover over battery box has been connected to the power vent fan. When the battery bank charges (at 38 amps DC) the batteries bubble up hydrogen gas and without the fan and cover, the room would reach explosive hydrogen levels in less than 1 minute. NEVER power up a battery system without a vent system!! A 4% concentration level of Hydrogen gas is highly explosive.

Two Sunny Island battery/inverters on the wall, eight 6 volt 820AH batteries below elevated off floor to make watering easier. DC cables connected and AC interconnections in Plastic conduit for safety. Ready to move some wiring from the main box to the emergency breaker box. Only items in the emergency box will be powered when running off grid. System cuts over instantly when grid drops out. Barely a flicker of the lights, it happens so fast! Same thing happens when power is restored. Back on grid in an instant.
When a lead-acid battery is discharged, the electrolyte (sulfuric acid) and the active material on the plates of the battery (lead) are consumed to produce water and lead sulfate and current flow. The chemical equation for a lead-acid battery during discharge is: PbO2 Pb 2H2SO4 –>PbSO4 2H2O Ideally it’s just hydrogen gas, but when doing Equalization charging, you’re going to get some hydrogen sulfide as well – you’ll know it by it’s Sulfur smell and the stinging sensation to your eyes! Make sure the battery box power exhaust fan works BEFORE you turn on your system. In this setup, I programmed the fan to run whenever the batteries are charging. As long as the fan is running, there is negative pressure in the box (or temporary tent in this case) so even any holes or leaks will take fresh air IN to the box/tent and then OUTside the house through the white PVC vent at the left. Happy to say that the 1st charge cycle was free from problems and there wasn’t even the tiniest hint of any gas in the room. The use of RECOMBINATION caps is HIGHLY recommended. They will eliminate almost all of the outgassing and make the battery liquid levels go down MUCH slower.

